Understanding Homebrew
Homebrew is a package manager for Mac OS. It lets you download binaries, packages, and applications with a single command.
In this article, I want to explain how to use Homebrew.
Installing Homebrew
You can install Homebrew with this command:
# Installs Homebrew/usr/bin/ruby -e "$(curl -fsSL https://raw.githubusercontent.com/Homebrew/install/master/install)"Updating Homebrew
To update homebrew, you use brew update. This updates Homebrew to its latest version. (You always want Homebrew to be at the latest version before downloading anything).
# updates Homebrewbrew updateInstalling a package
Each package is called a formula. To install a formula, you use the install command.
brew install <formula>For example, to install Node with Homebrew, you use this:
brew install nodeIf you’re feeling bored, here’s a list of everything you can install with Homebrew. You can also find a list of formulae I use in my Dotfiles repository. (Unsure what dotfiles are? Read this).
Upgrade a package
To upgrade one package, you use this:
# Upgrades one package to the latest versionbrew upgrade <formula>To upgrade all packages, you use brew upgrade without specifying any formulas.
# Upgrades all packages to their latest versionbrew upgradeDowngrade a package
Let’s say you have the latest version of Node installed. You want to downgrade to a previous version.
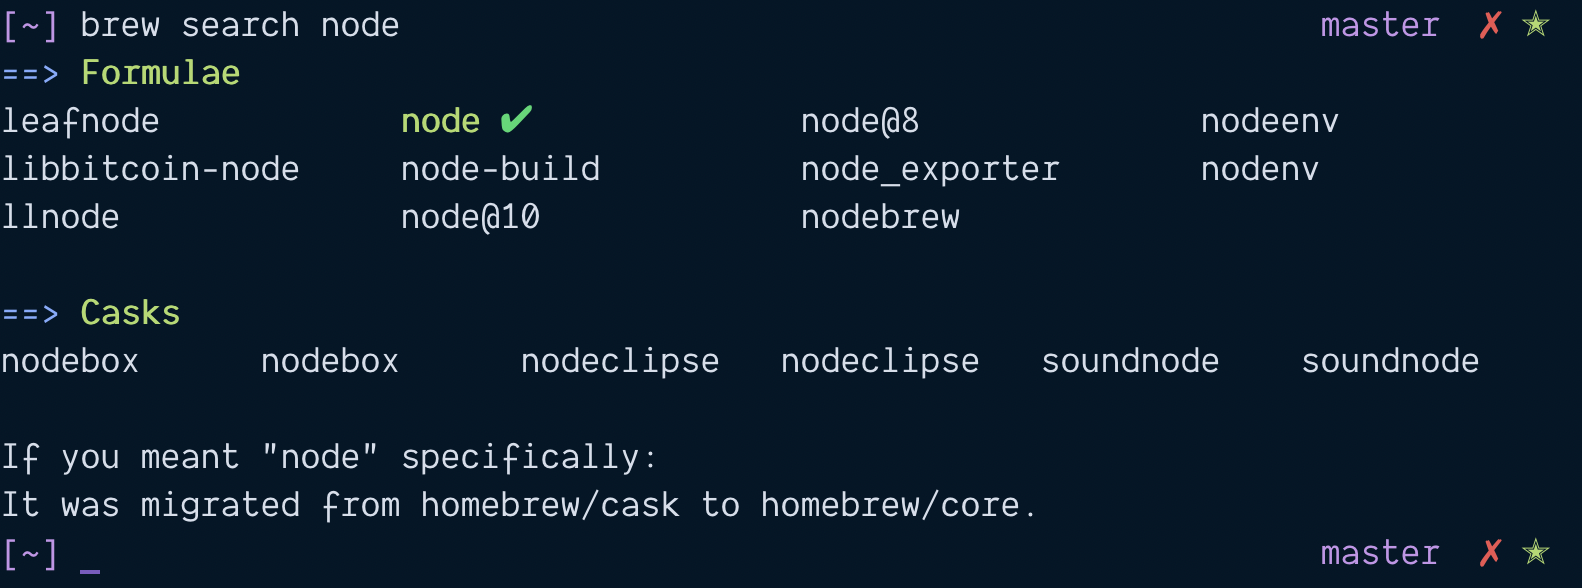
First, you need to use brew search to find the package.
brew search nodeYou want to find the possible versions to download from the results. In this example, we can install node v8 or v10.
Install the version you want to use. In this case, lets install Node 10.
brew install node@10Next, we need to unlink our current node version.
# Unlinking nodebrew unlink nodeThen, we need to link the version we installed. In this case, it’s Node@10. To link a formula, you use the link command.
# Linking nodebrew link node@10
Sometimes, (like in this case), you need to use --force to link the formula.
brew link node@10 --force
Now if you run node -v, you should see that Node v10 is installed.
node -v
Notice its Node is now v10.16.3. Unfortunately, with Homebrew, we don’t get to use Semantic Versioning with Homebrew, so you can’t install specific versions. You can only perform major version upgrade/downgrades.
(But this is enough 99% of the time).
To change back to the latest node version, you repeat the unlink and link steps:
brew unlink node@10brew link node
Here’s the funny thing about Node + Homebrew.
When you run brew `link node, Homebrew doesn’t install npm for you. So if you want to install any Node version, make sure you run install or reinstall instead.
brew reinstall nodeI really shouldn’t have used Node as an example 🤦♂️… But I still decided to use it because nobody talked about the npm problem I mentioned above.
Deleting a package
To remove a package, you use the uninstall command.
brew uninstall <formula>Brew cleanup
Once in a while, you might want to run brew cleanup to remove state and outdated downloads from your computer. (Free up space! 😎).
brew cleanupBrew tap
Homebrew manages a list of formulae in a place called homebrew/core. When you install files, you install from this list.
“Core” here means folks at Homebrew maintain the formulae list.
Other people can let you install their stuff with Homebrew as well. To do this, they need to create a formulae list. Then, they have to publish this list.
brew tap lets you add a third-party formulae list into Homebrew. Once you added the formulae list, you can use brew install to install the formula.
For example, to install MongoDB with Homebrew, you need to tap into mongodb/brew.
# Required to install MongoDB with Homebrewbrew tap mongodb/brewThen, you install MongoDB like this:
# Installs MongoDBbrew install mongodb-communityBrew Cask
Homebrew contains another formulae list called homebrew/cask. This list lets you install GUI applications like Google Chrome, Safari, Atom, and others.
To install a cask, you use the brew cask install command.
# Installs Google Chromebrew cask install google-chromeThat’s it!