Building a Simple CRUD app with Node, Express, and MongoDB
I finally understood how to work with Node, Express, and MongoDB. I want to write a comprehensive tutorial so you won’t have to go through the same headache I went through.
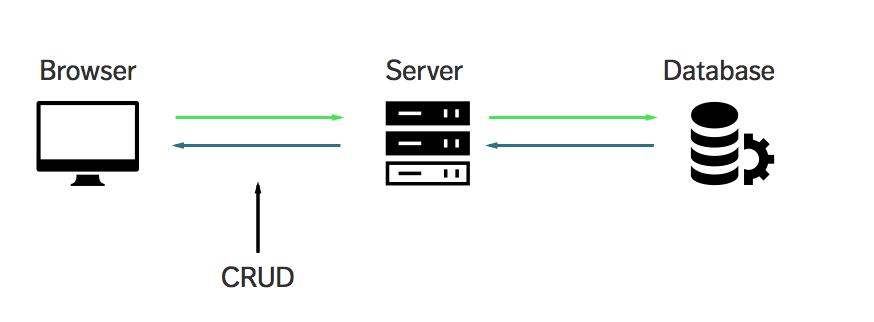
CRUD, Express and MongoDB
CRUD, Express and MongoDB are big words for a person who has never touched any server-side programming in their life. Let’s quickly introduce what they are before we diving into the tutorial.
Express is a framework for building web applications on top of Node.js. It simplifies the server creation process that is already available in Node. In case you were wondering, Node allows you to use JavaScript as your server-side language.
MongoDB is a database. This is the place where you store information for your websites (or applications).
CRUD is an acronym for Create, Read, Update and Delete. It is a set of operations we get servers to execute (POST, GET, PUT and DELETE requests respectively). This is what each operation does:
- Create (POST) - Make something
- Read (GET)- Get something
- Update (PUT) - Change something
- Delete (DELETE)- Remove something
POST, GET, PUT, and DELETE requests let us construct Rest APIs.
If we put CRUD, Express and MongoDB together into a single diagram, this is what it would look like:
Does CRUD, Express and MongoDB makes more sense to you now?
Great. Let’s move on.
We’ll build a simple application together
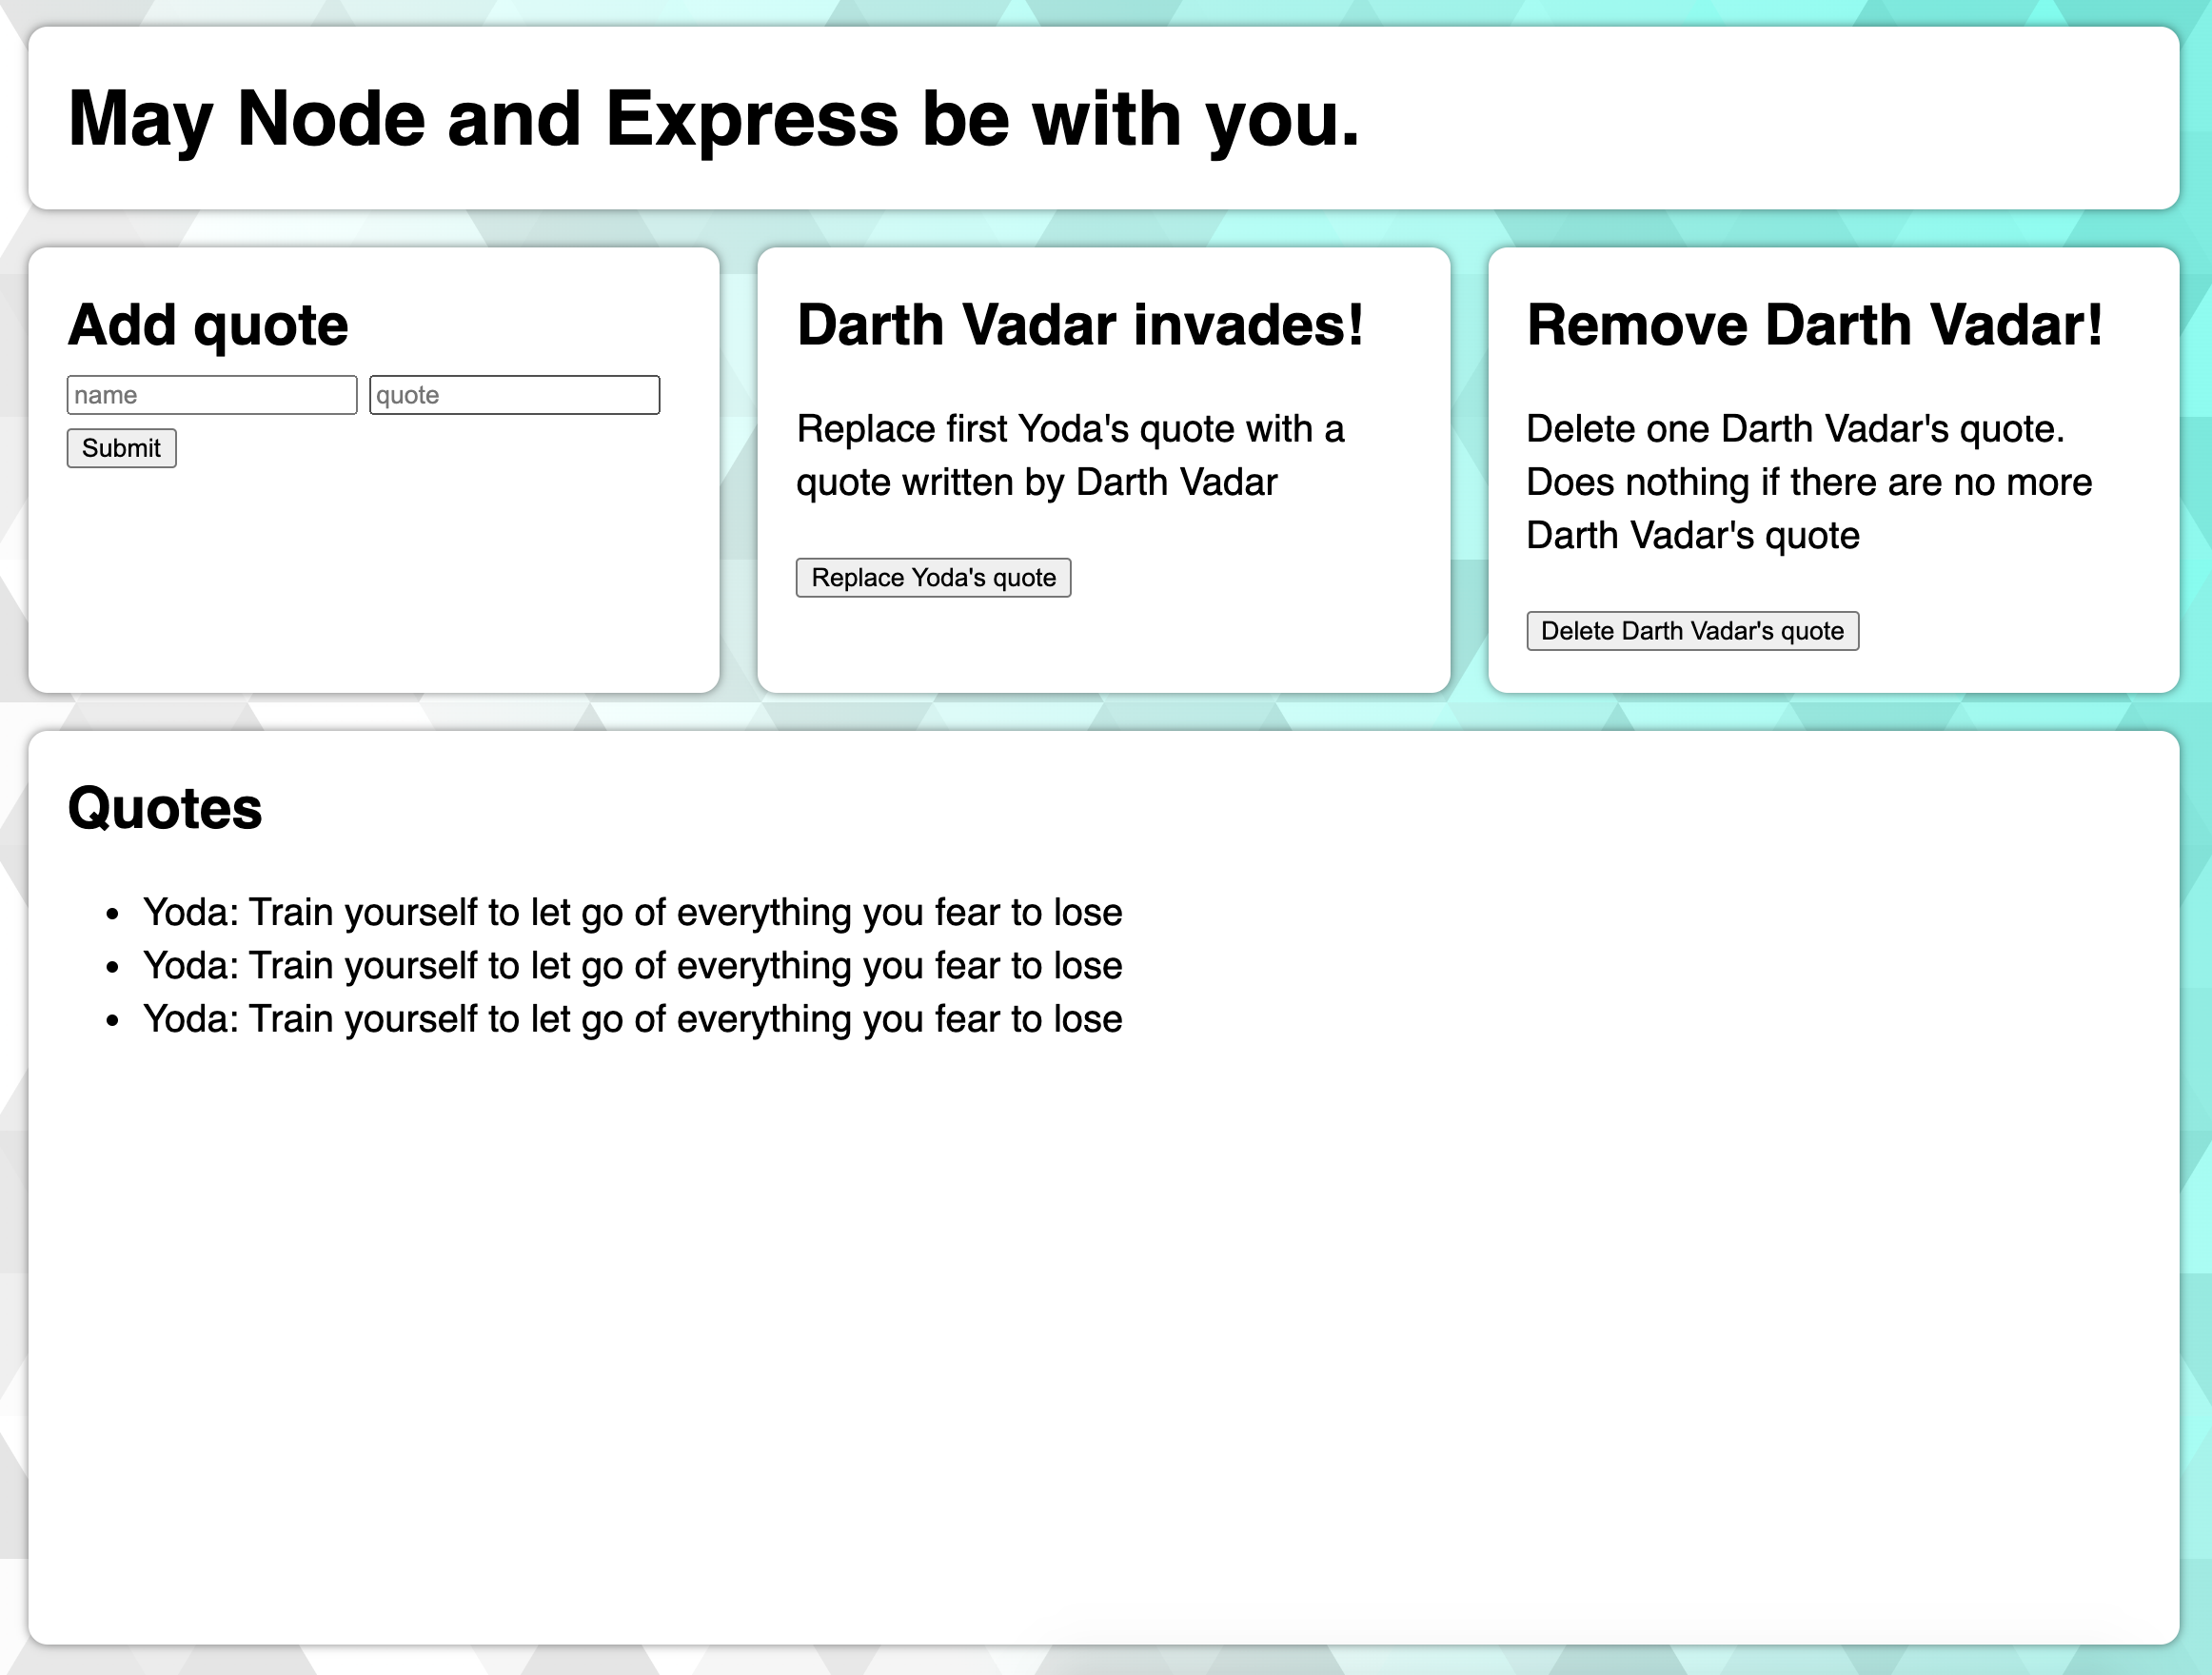
Let’s build a simple application that lets you track a list of quotes from Star Wars Characters. Here’s what it looks like:
Free free to check out the demo before continuing with this tutorial.
This article is LONG! Remember to grab the source code by leaving your name and email address in this form. I’ll also send you this article in PDF so you can read it at your leisure.
By the way, I’m not going to focus on the styles since we’re focusing on learning Crud, Express, and MongoDB in this tutorial.
Prerequisites
You’ll need two things to get started with this tutorial:
- You are not afraid of typing commands into a Command Line. If you’re afraid, use this article to get over your fear.
- You need to have Node installed.
To check if you have Node installed, open up your Command Line and run the following code:
$ node -v
You should get a version number if you have Node installed. If you don’t, you can install Node either by downloading the installer from Node’s website or downloading it through package managers like Homebrew (Mac) and Chocolatey (Windows).
Getting started
Start by creating a folder for this project. Feel free to call it anything you want. After you’ve created the folder, navigate into it with the Terminal and run npm init.
npm init creates a package.json file which helps you manage dependencies (which we will install as we go through the tutorial).
$ npm init
Just hit enter through everything that appears. I’ll talk about the ones you need to know as we go along.
Running Node for the first time in your life
The simplest way to use node is to run the node command, and specify a path to a file. Let’s create a file called server.js to run node with.
touch server.jsNext, put this a console.log statement into server.js. This lets us know whether Node is running properly.
console.log('May Node be with you')Now, run node server.js in your command line and you should see this:

Great. Node works. The next step is to learn to use Express.
Using Express
First, we have to install Express. We can do this by running the npm install command. (npm is installed with Node, which is why you use commands like npm init and npm install).
Run npm install express command in your command line.
What you install using npm will be added as a dependency in package.json.
It’s important to know these dependencies because npm can retrieve
dependencies with another npm install command when you need it later.
npm install express
Next, we use express in server.js by requiring it.
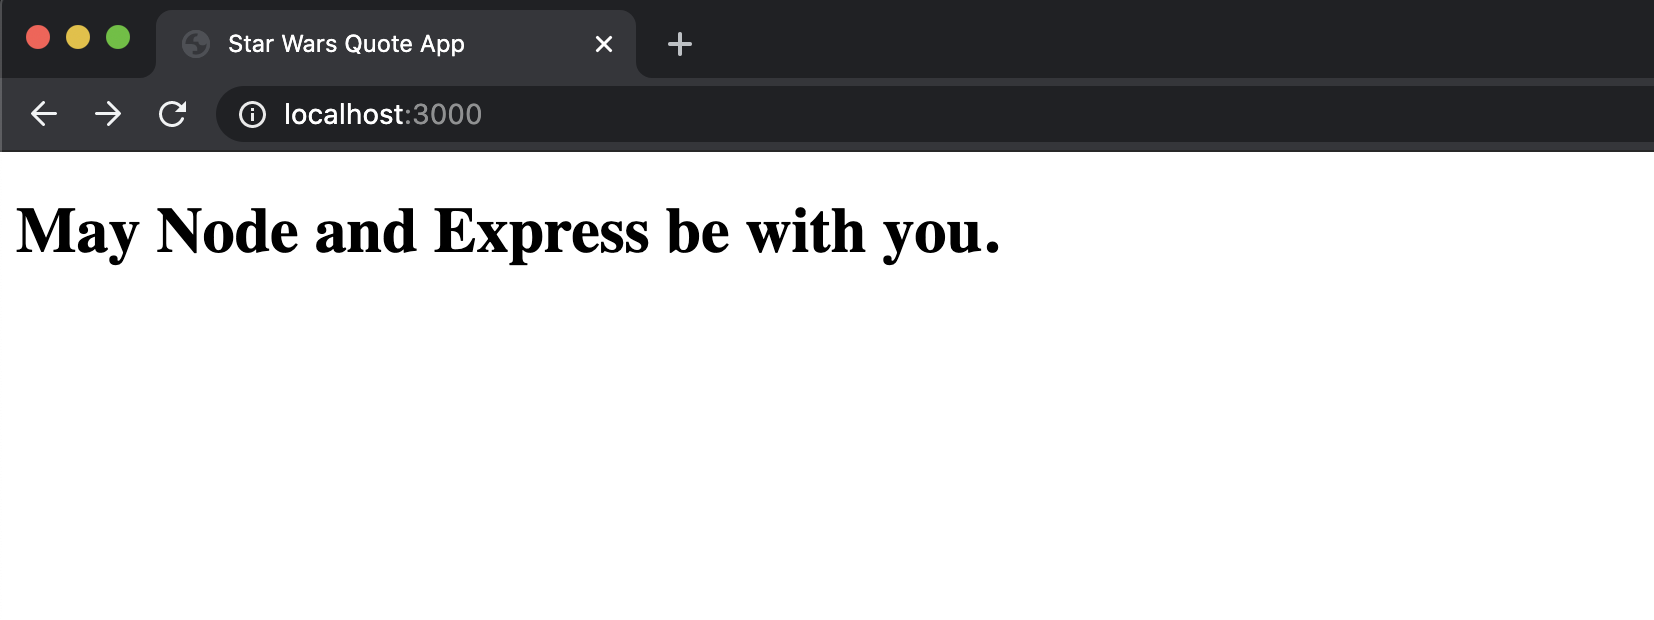
const express = require('express')const app = express()We need to create a server that browsers can connect to. We do this by using the Express’s listen method.
app.listen(3000, function () { console.log('listening on 3000')})Now, run node server.js and navigate to localhost:3000 on your browser. You should see a message that says cannot get /.

That’s a good sign. It means we can now communicate to our express server through the browser. This is where we begin CRUD operations.
CRUD - READ
Browsers perform the READ operation when you visit a website. Under the hood, they send a GET request to the server to perform this READ operation.
You see cannot get / because our server sent nothing back to the browser.
In Express, we handle a GET request with the get method:
app.get(endpoint, callback)endpoint is the requested endpoint. It’s the value that comes after your domain name. Here are some examples:
- When you visit
localhost:3000, you’re actually visitinglocalhost:3000/. In this case, browsers requested for/. - You’re reading this article on
https://zellwk.com/blog/crud-express-mongodb/. The domain name iszellwk.com. The requested endpoint is anything that comes afterzellwk.com(which is/blog/crud-express-mongodb).
callback tells the server what to do when the requested endpoint matches the endpoint stated. It takes two arguments: A request object and a response object.
// We normally abbreviate `request` to `req` and `response` to `res`.app.get('/', function (req, res) { // do something here})For now, let’s write Hello World back to the browser. We do so by using a send method that comes with the response object:
app.get('/', function (req, res) { res.send('Hello World')})I’m going to start writing in ES6 code and show you how to convert to ES6 along the way as well. First off, I’m replacing function() with an ES6 arrow function. The below code is the same as the above code:
app.get('/', (req, res) => { res.send('Hello World')})Now, restart your server by doing the following:
- Stop the current server by hitting
CTRL + Cin the command line. - Run
node server.jsagain.
Then, navigate to localhost:3000 on your browser. You should be able to see a string that says “Hello World”.

Great.
Next, let’s change server.js so we serve up an index.html page back to the browser. To do this, we use the sendFile method that’s provided by the res object.
app.get('/', (req, res) => { res.sendFile(__dirname + '/index.html') // Note: __dirname is the current directory you're in. Try logging it and see what you get! // Mine was '/Users/zellwk/Projects/demo-repos/crud-express-mongo' for this app.})In the sendFile method above, we told Express to serve an index.html file that can be found in the root of your project folder. We don’t have that file yet. Let’s make it now.
touch index.htmlLet’s put some text in our index.html file as well:
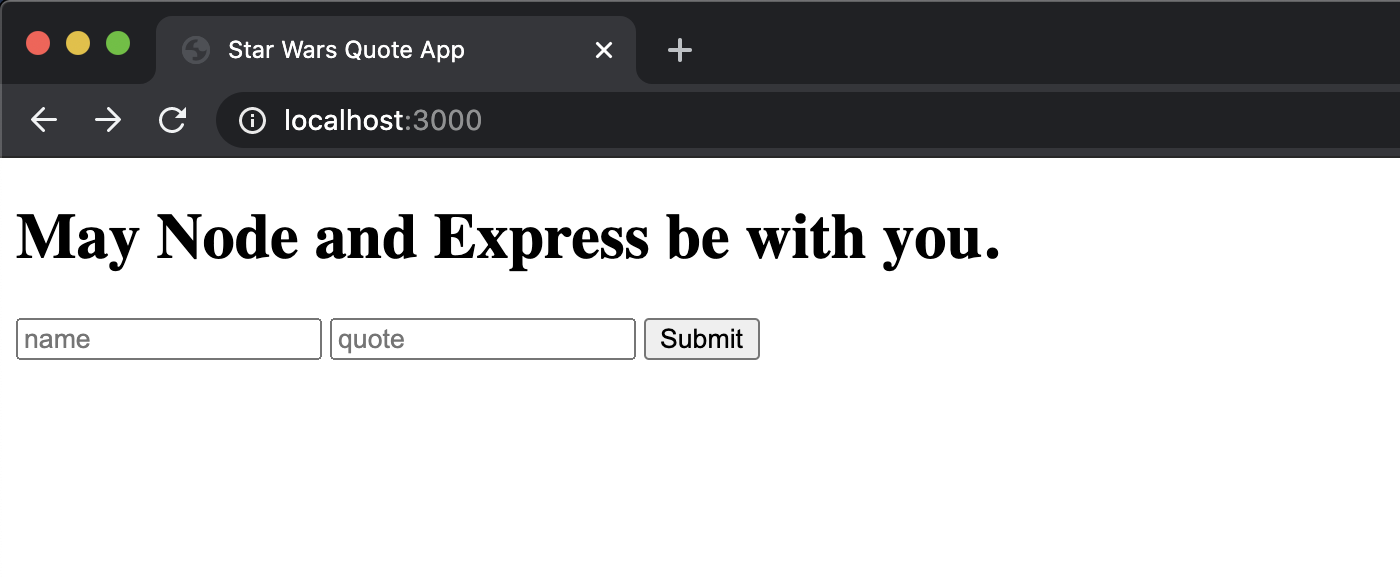
<!DOCTYPE html><html lang="en"> <head> <meta charset="UTF-8" /> <title>MY APP</title> </head> <body> <h1>May Node and Express be with you.</h1> </body></html>Restart your server and refresh your browser. You should be able to see your HTML file now.
This is how Express handles a GET request (READ operation) in a nutshell.
At this point, you probably have realized that you need to restart your server whenever you make a change to server.js. This process is incredibly tedious, so let’s take a quick detour and streamline it by using a tool called nodemon.
Enter Nodemon
Nodemon restarts the server automatically when you save a file that’s used by the server.js. We can install Nodemon with the following command:
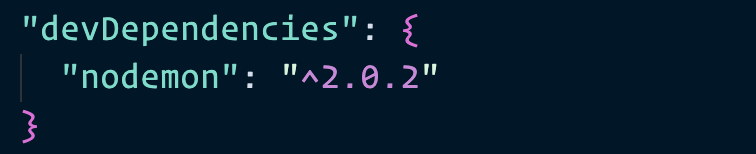
$ npm install nodemon --save-devWe use a --save-dev flag here because we only use Nodemon when we are
developing stuff. We won’t use Nodemon on an actual server. --save-dev here
adds Nodemon as a devDependency in the package.json file.
Nodemon behaves like Node. So you can run nodemon server.js and you’d expect to see the same thing. Unfortunately, this only works if you’ve installed nodemon globally with the -g flag (and we didn’t do this).
We have other ways to run Nodemon. For example, you can execute Nodemon directly from the node_modules folder. This is super unwieldy, but it works:
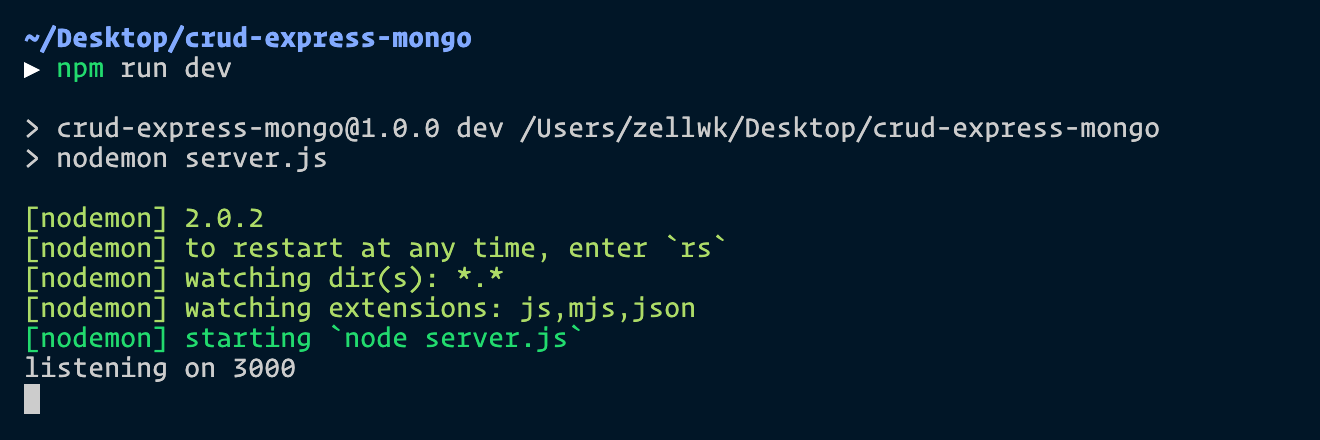
./node_modules/.bin/nodemon server.jsWe can make things simpler by adding script key in the package.json file. This lets us run nodemon server.js without the ./node_modules... preamble.
{ // ... "scripts": { "dev": "nodemon server.js" } // ...}Now, you can run npm run dev to trigger nodemon server.js.
Node v18.11 added support for watch mode. This watches for changes and
restarts the server so you don’t have to use Nodemon. You can simply run node --watch server.js instead.
Back to the main topic. We’re going to cover the CREATE operation next.
CRUD - CREATE
Browsers can only perform a CREATE operation if they send POST request to the server. This POST request can be triggered through JavaScript or through a <form> element.
Let’s figure out how to use a <form> element to create new entries for this Star Wars quote application for now. We’ll examine how to send requests via JavaScript later.
To send a POST request through a <form>, you need to add the <form> element to your index.html file.
You need three things on this form element:
- An
actionattribute - A
methodattribute nameattributes on each<input>elements within the form
<form action="/quotes" method="POST"> <input type="text" placeholder="name" name="name" /> <input type="text" placeholder="quote" name="quote" /> <button type="submit">Submit</button></form>The method tells browsers what kind of request to send. In this case, we use POST because we’re sending a POST request.
The action attribute tells the browser where to send the POST request. In this case, we’re send the POST request to /quotes.
We can handle this POST request with a post method in server.js. The path path should be the value you placed in the action attribute.
app.post('/quotes', (req, res) => { console.log('Hellooooooooooooooooo!')})Restart your server (hopefully you’ve set up Nodemon or are using –watch so it restarts automatically) and refresh your browser. Then, enter something into the <form> element and submit the form. Next, look at your command line. You should see Hellooooooooooooooooo! in your command line.

Great, we know that Express is handling the form for us right now. The next question is, how do we get the input values with Express?
Turns out, Express doesn’t handle reading data from the <form> element on it’s own. We have to use middleware to gain this functionality. It will help to tidy up the request object before we use it. Express lets us use middleware with the use method.
const express = require('express')const app = express()
// Make sure you place this before your CRUD handlers!app.use(express.urlencoded({ extended: true }))
// All your handlers here...app.get('/', (req, res) => {  /*...*/})app.post('/quotes', (req, res) => {  /*...*/})
The urlencoded method on express tells express to extract data from the <form> element and add them to the body property in the request object.
You should be able to see values from the <form> element inside req.body now. Try doing a console.log and see what it is!
app.post('/quotes', (req, res) => { console.log(req.body)})You should see an object similar to the following:

Hmmm.
Master Yoda has spoken! Let’s make sure we remember Yoda’s words. It’s important. We want to be able to retrieve it the next time we load our index page.
Enter the database, MongoDB.
MongoDB
MongoDB is a database. We can store information into this database to remember Yoda’s words. Then, we can retrieve this information and display to people who view our app.
I normally use Mongoose (which is a framework for MongoDB) when I use MongoDB. I’ll teach you how to use basic MongoDB in this article. If you want to learn Mongoose, consider reading my article on Mongoose.
First, we need to install MongoDB via npm.
npm install mongodbOnce installed, we can connect to MongoDB through the MongoClient’s connect method as shown in the code below:
const MongoClient = require('mongodb').MongoClientMongoClient.connect('mongodb-connection-string', (err, client) => { // ... do something here})The next part is to get the correct link to our database. Most people store their databases on cloud services like MongoDB Atlas. We’re going to do same as well. (It’s free).
You can also create a database on your computer for development work. Read “How to setup a local MongoDB Connection” for instructions.
Setting up MongoDB Atlas
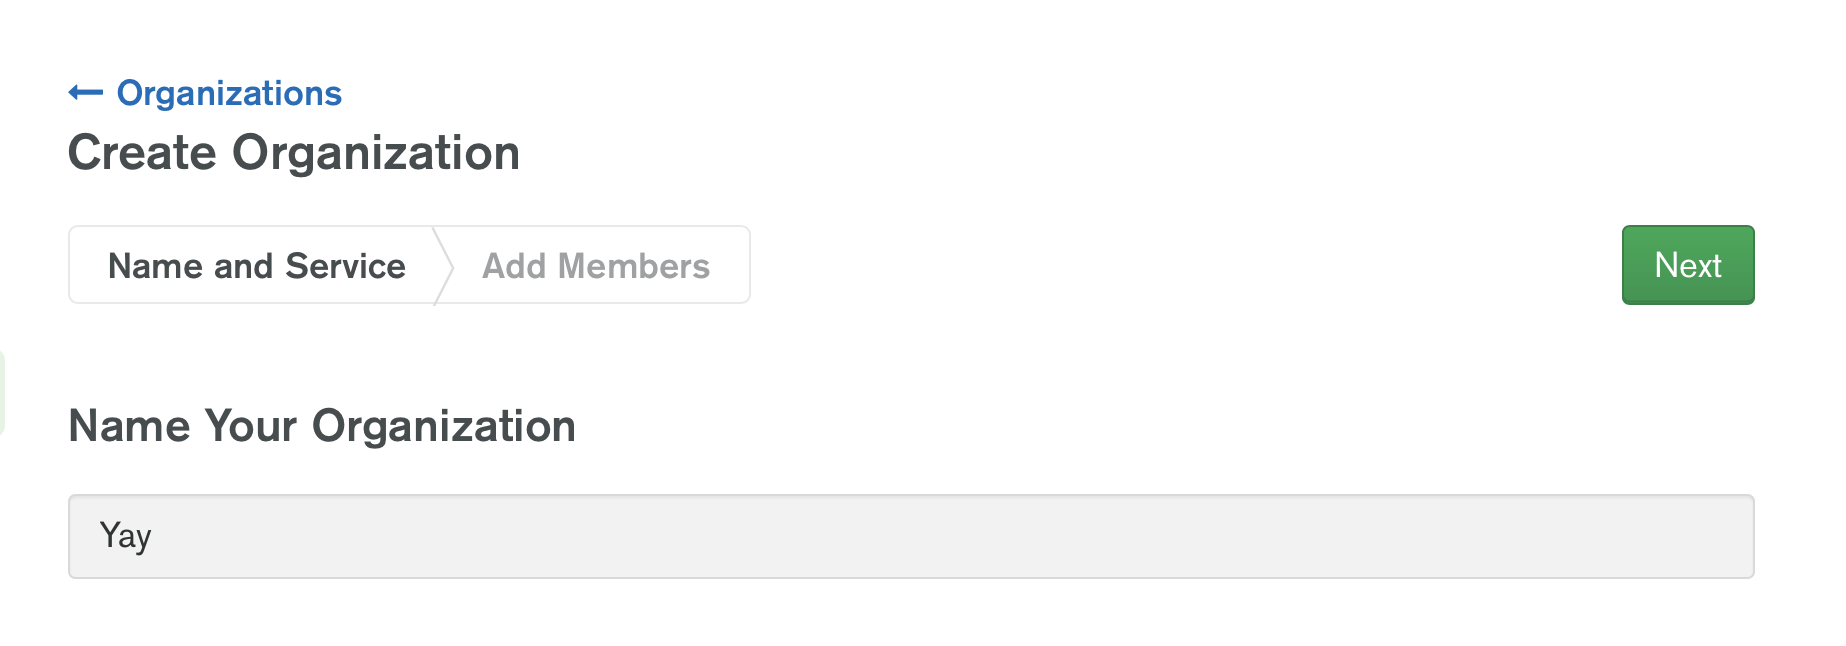
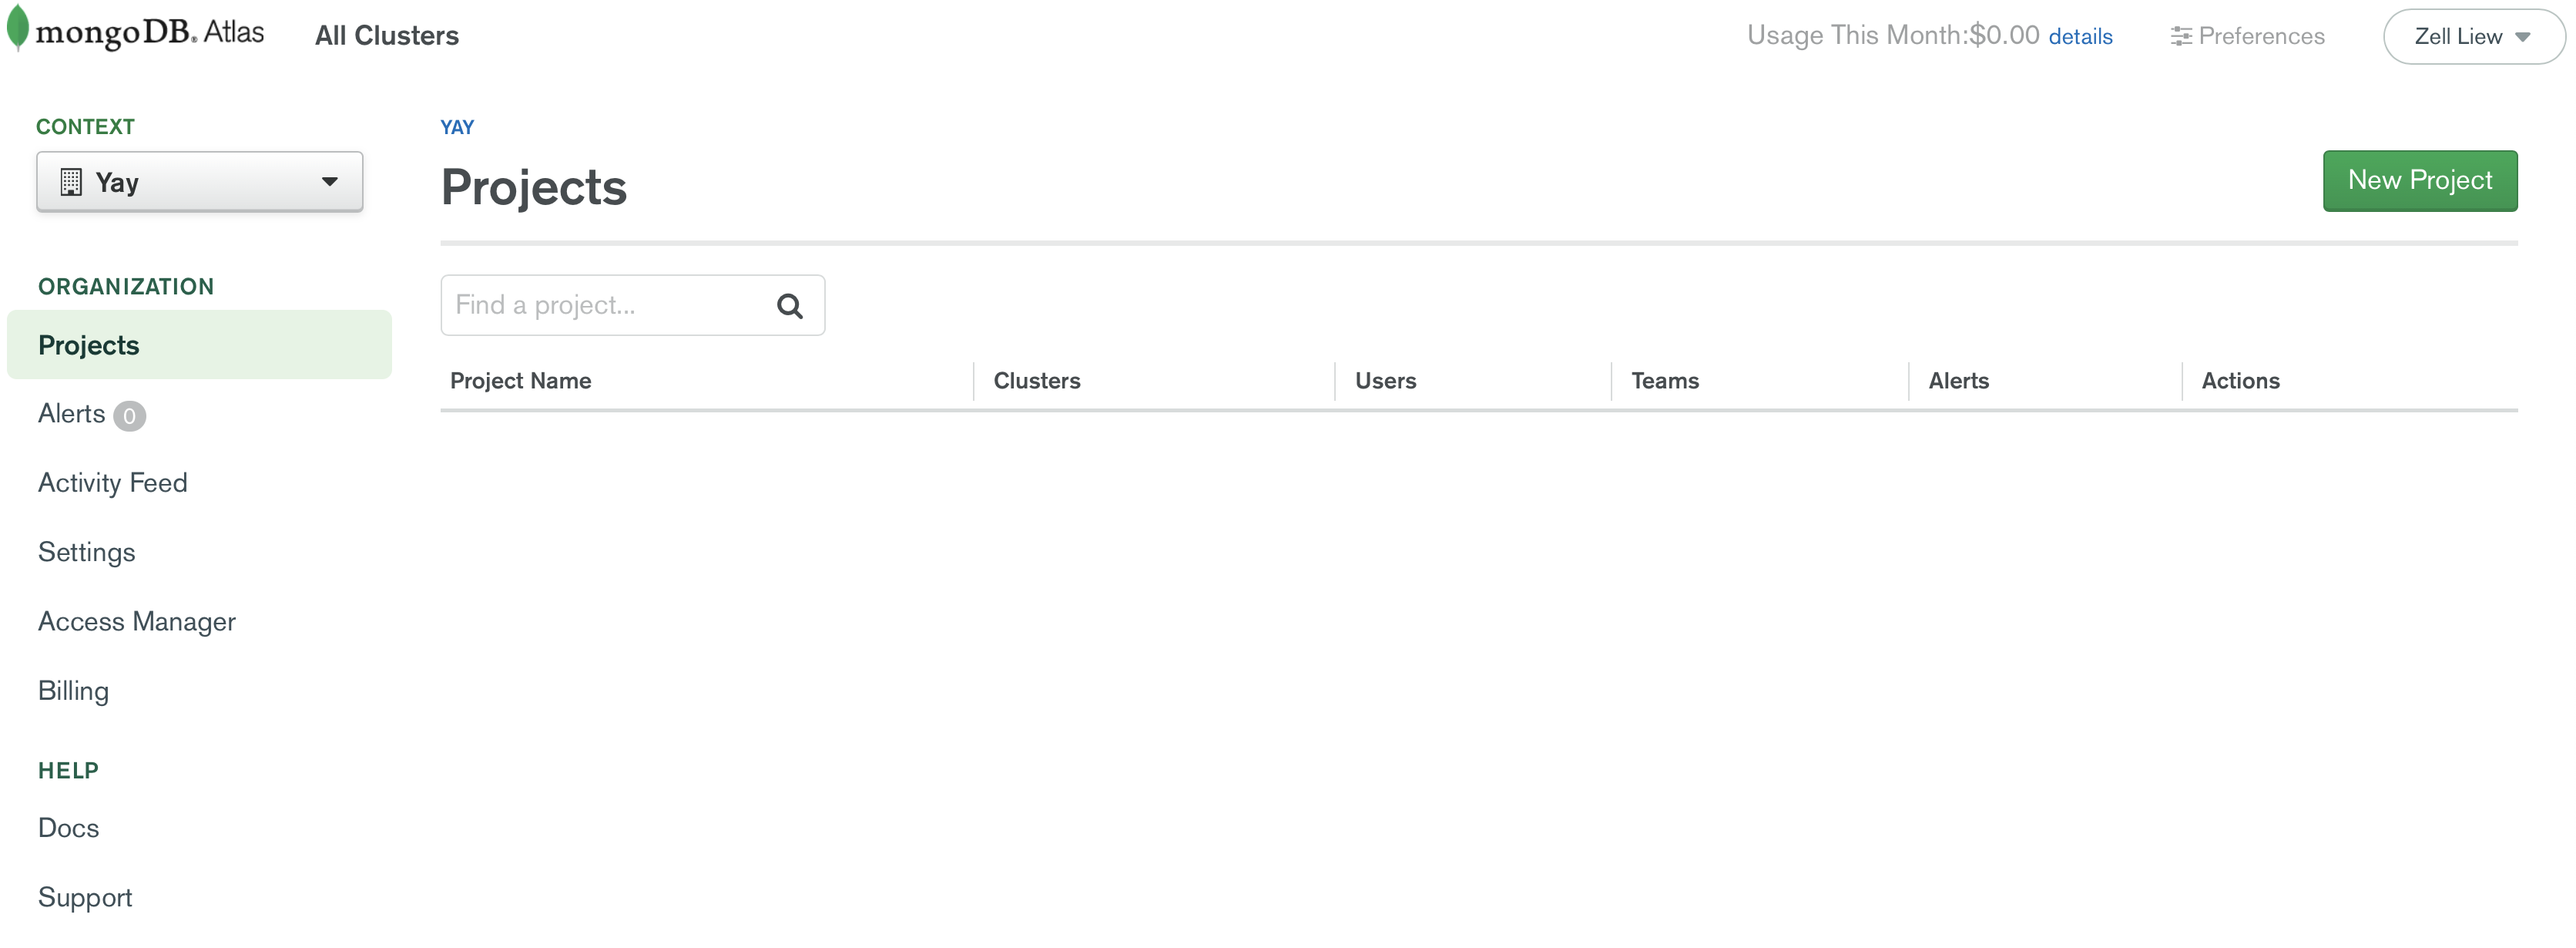
Go ahead and create an account on MongoDB Atlas. Once you’re done, you need to create an “Organization”. It’s sort of like a company name. You can name it anything you want. (You can change it later).
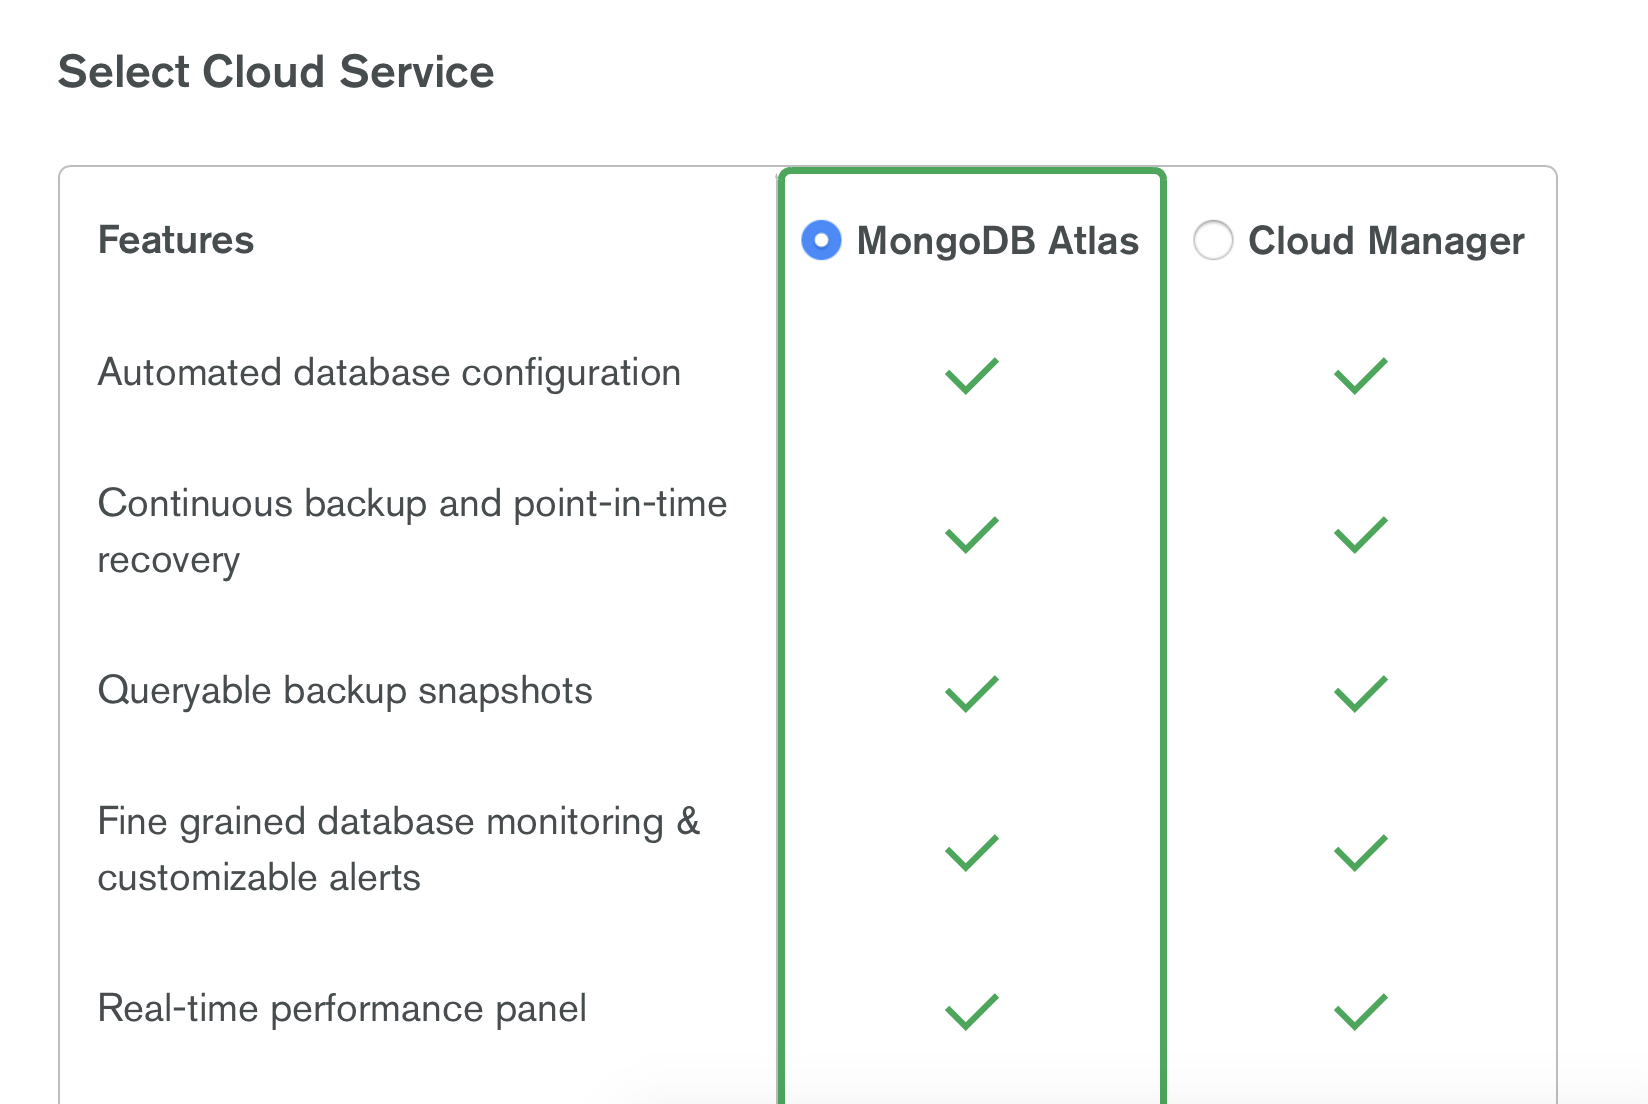
You also need to select a cloud service. Go ahead with MongoDB Atlas in this case.
Next, you need to set permissions for users. MongoDB Atlas will automatically fill up your current email address as the user. So just continue to the next step.
You should end up with a screen that looks like this:
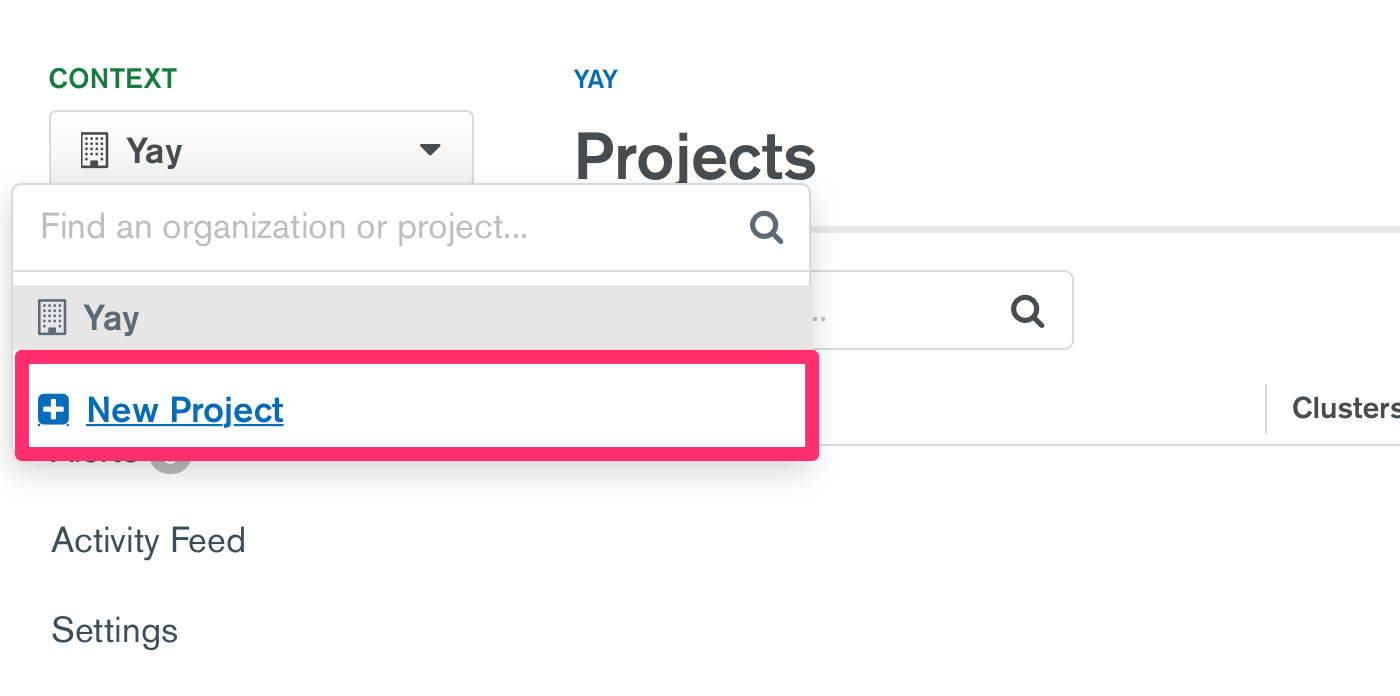
Next, you need to create a Database in MongoDB Atlas. There are several steps to do this.
First, you need to create a new Project. You can do this by going under “Context” in the top left hand menu. Click the Dropdown. Then, select New Project.
Next, you will need to name your project. Call it anything you want. I’m going to call this star-wars.
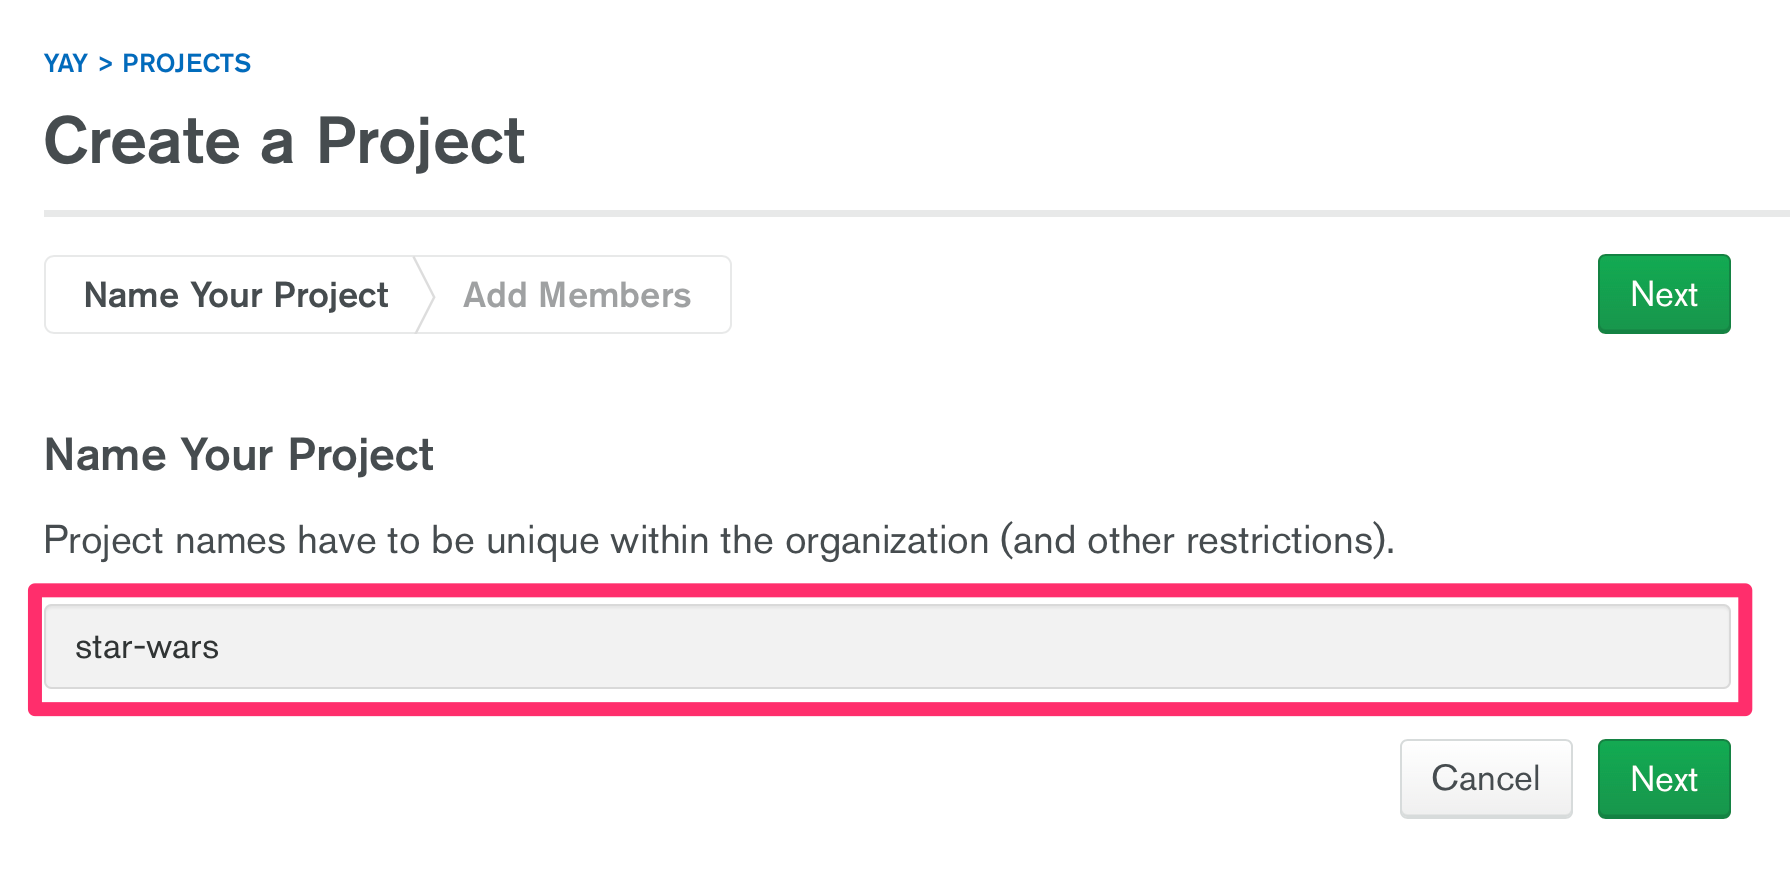
Then, you will need to add members. Again, you’re already added so go ahead and click “Create Project” to move on.
You should end up with a screen that says Create a Cluster.
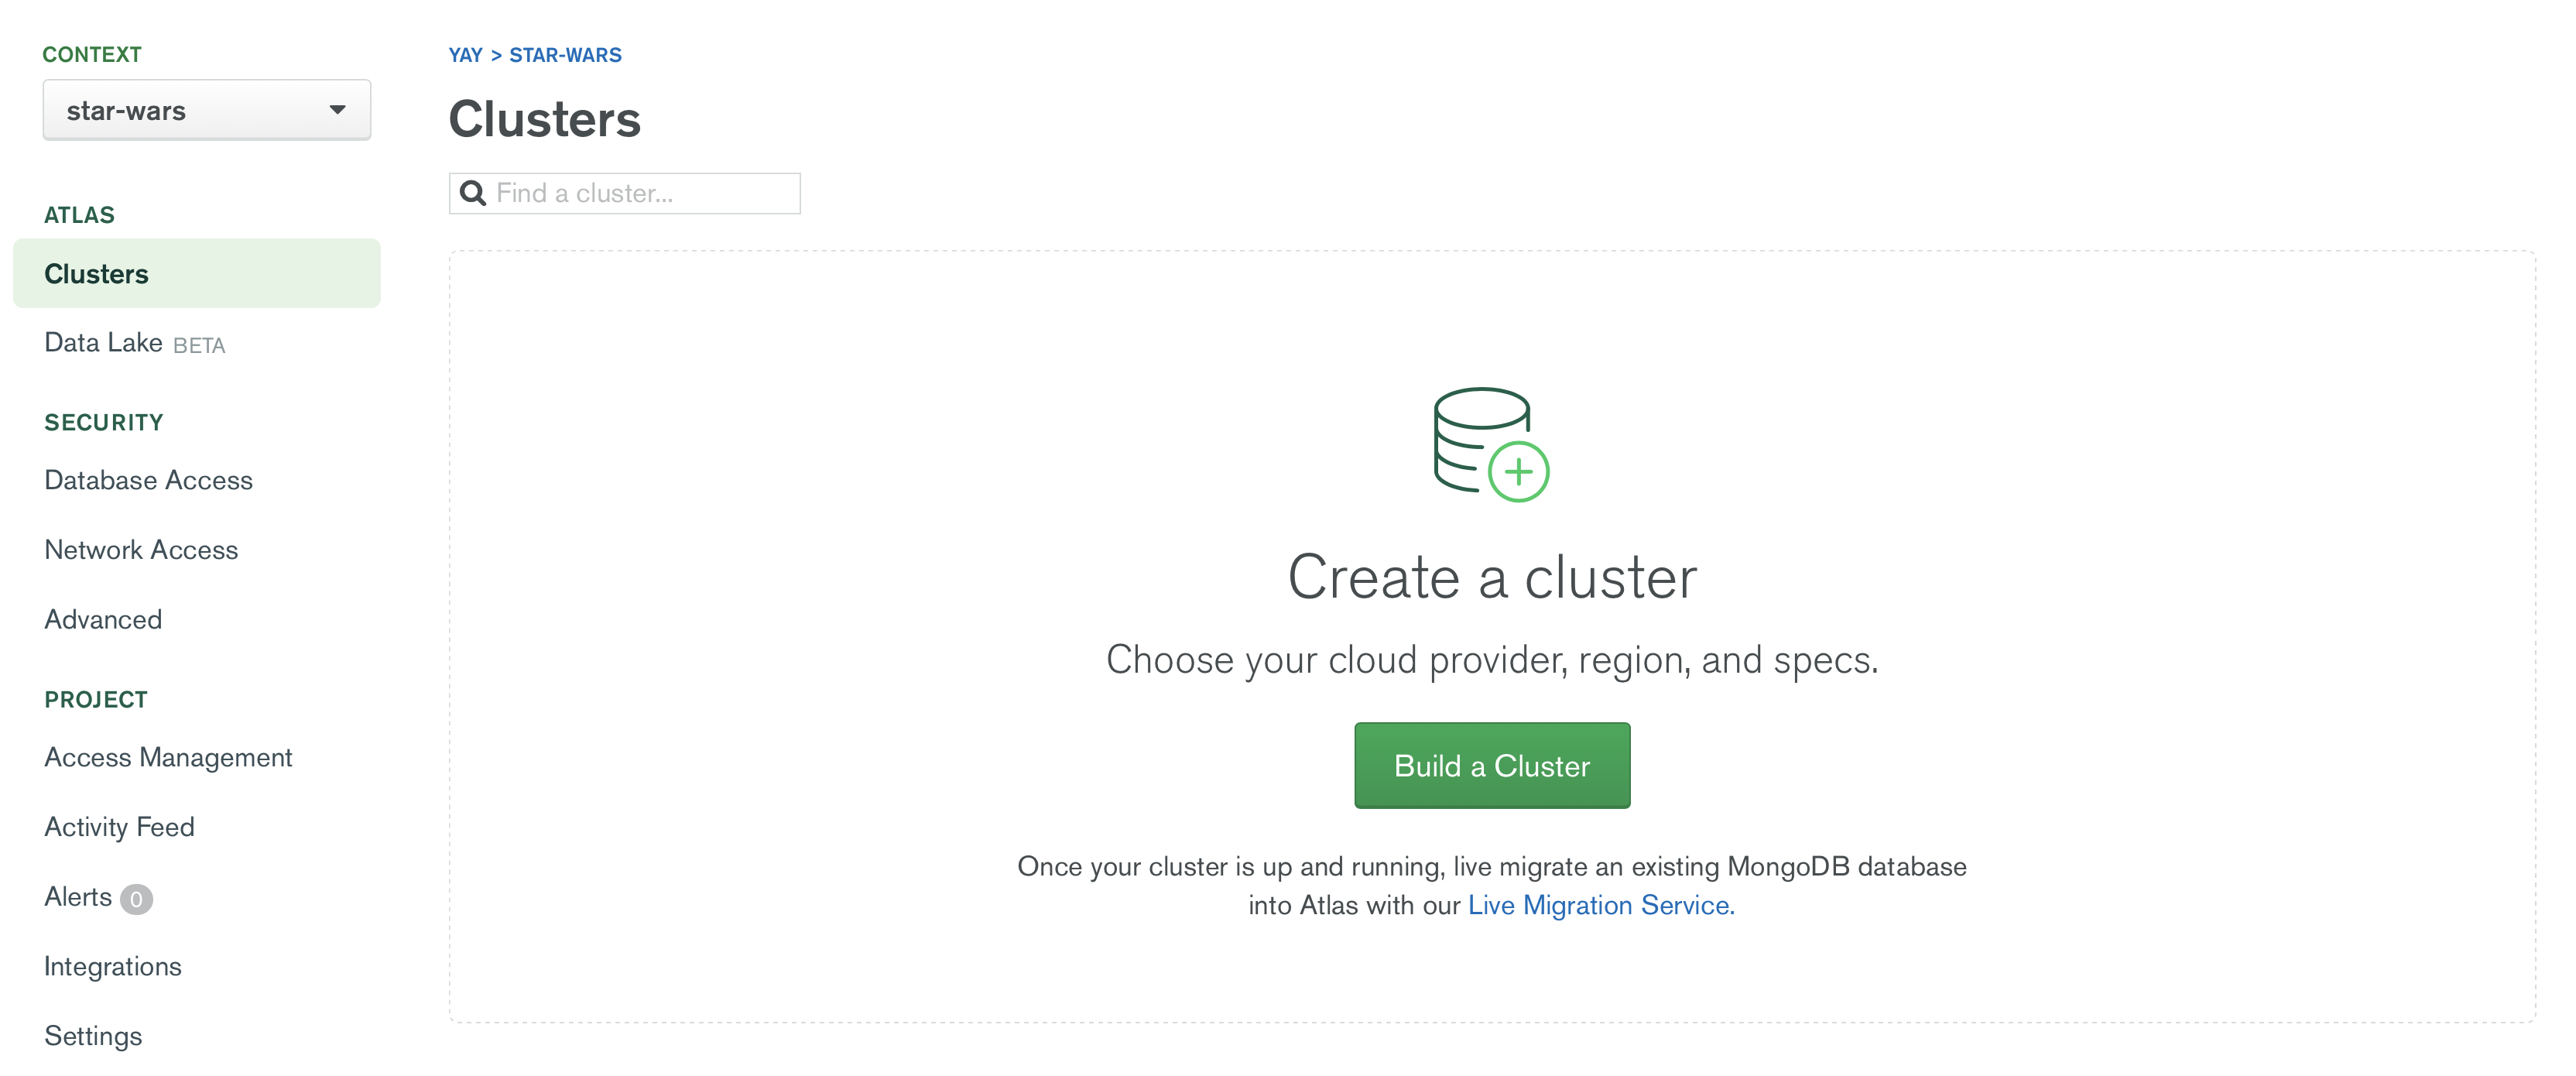
Click on “Build a Cluster”. You should see this screen:
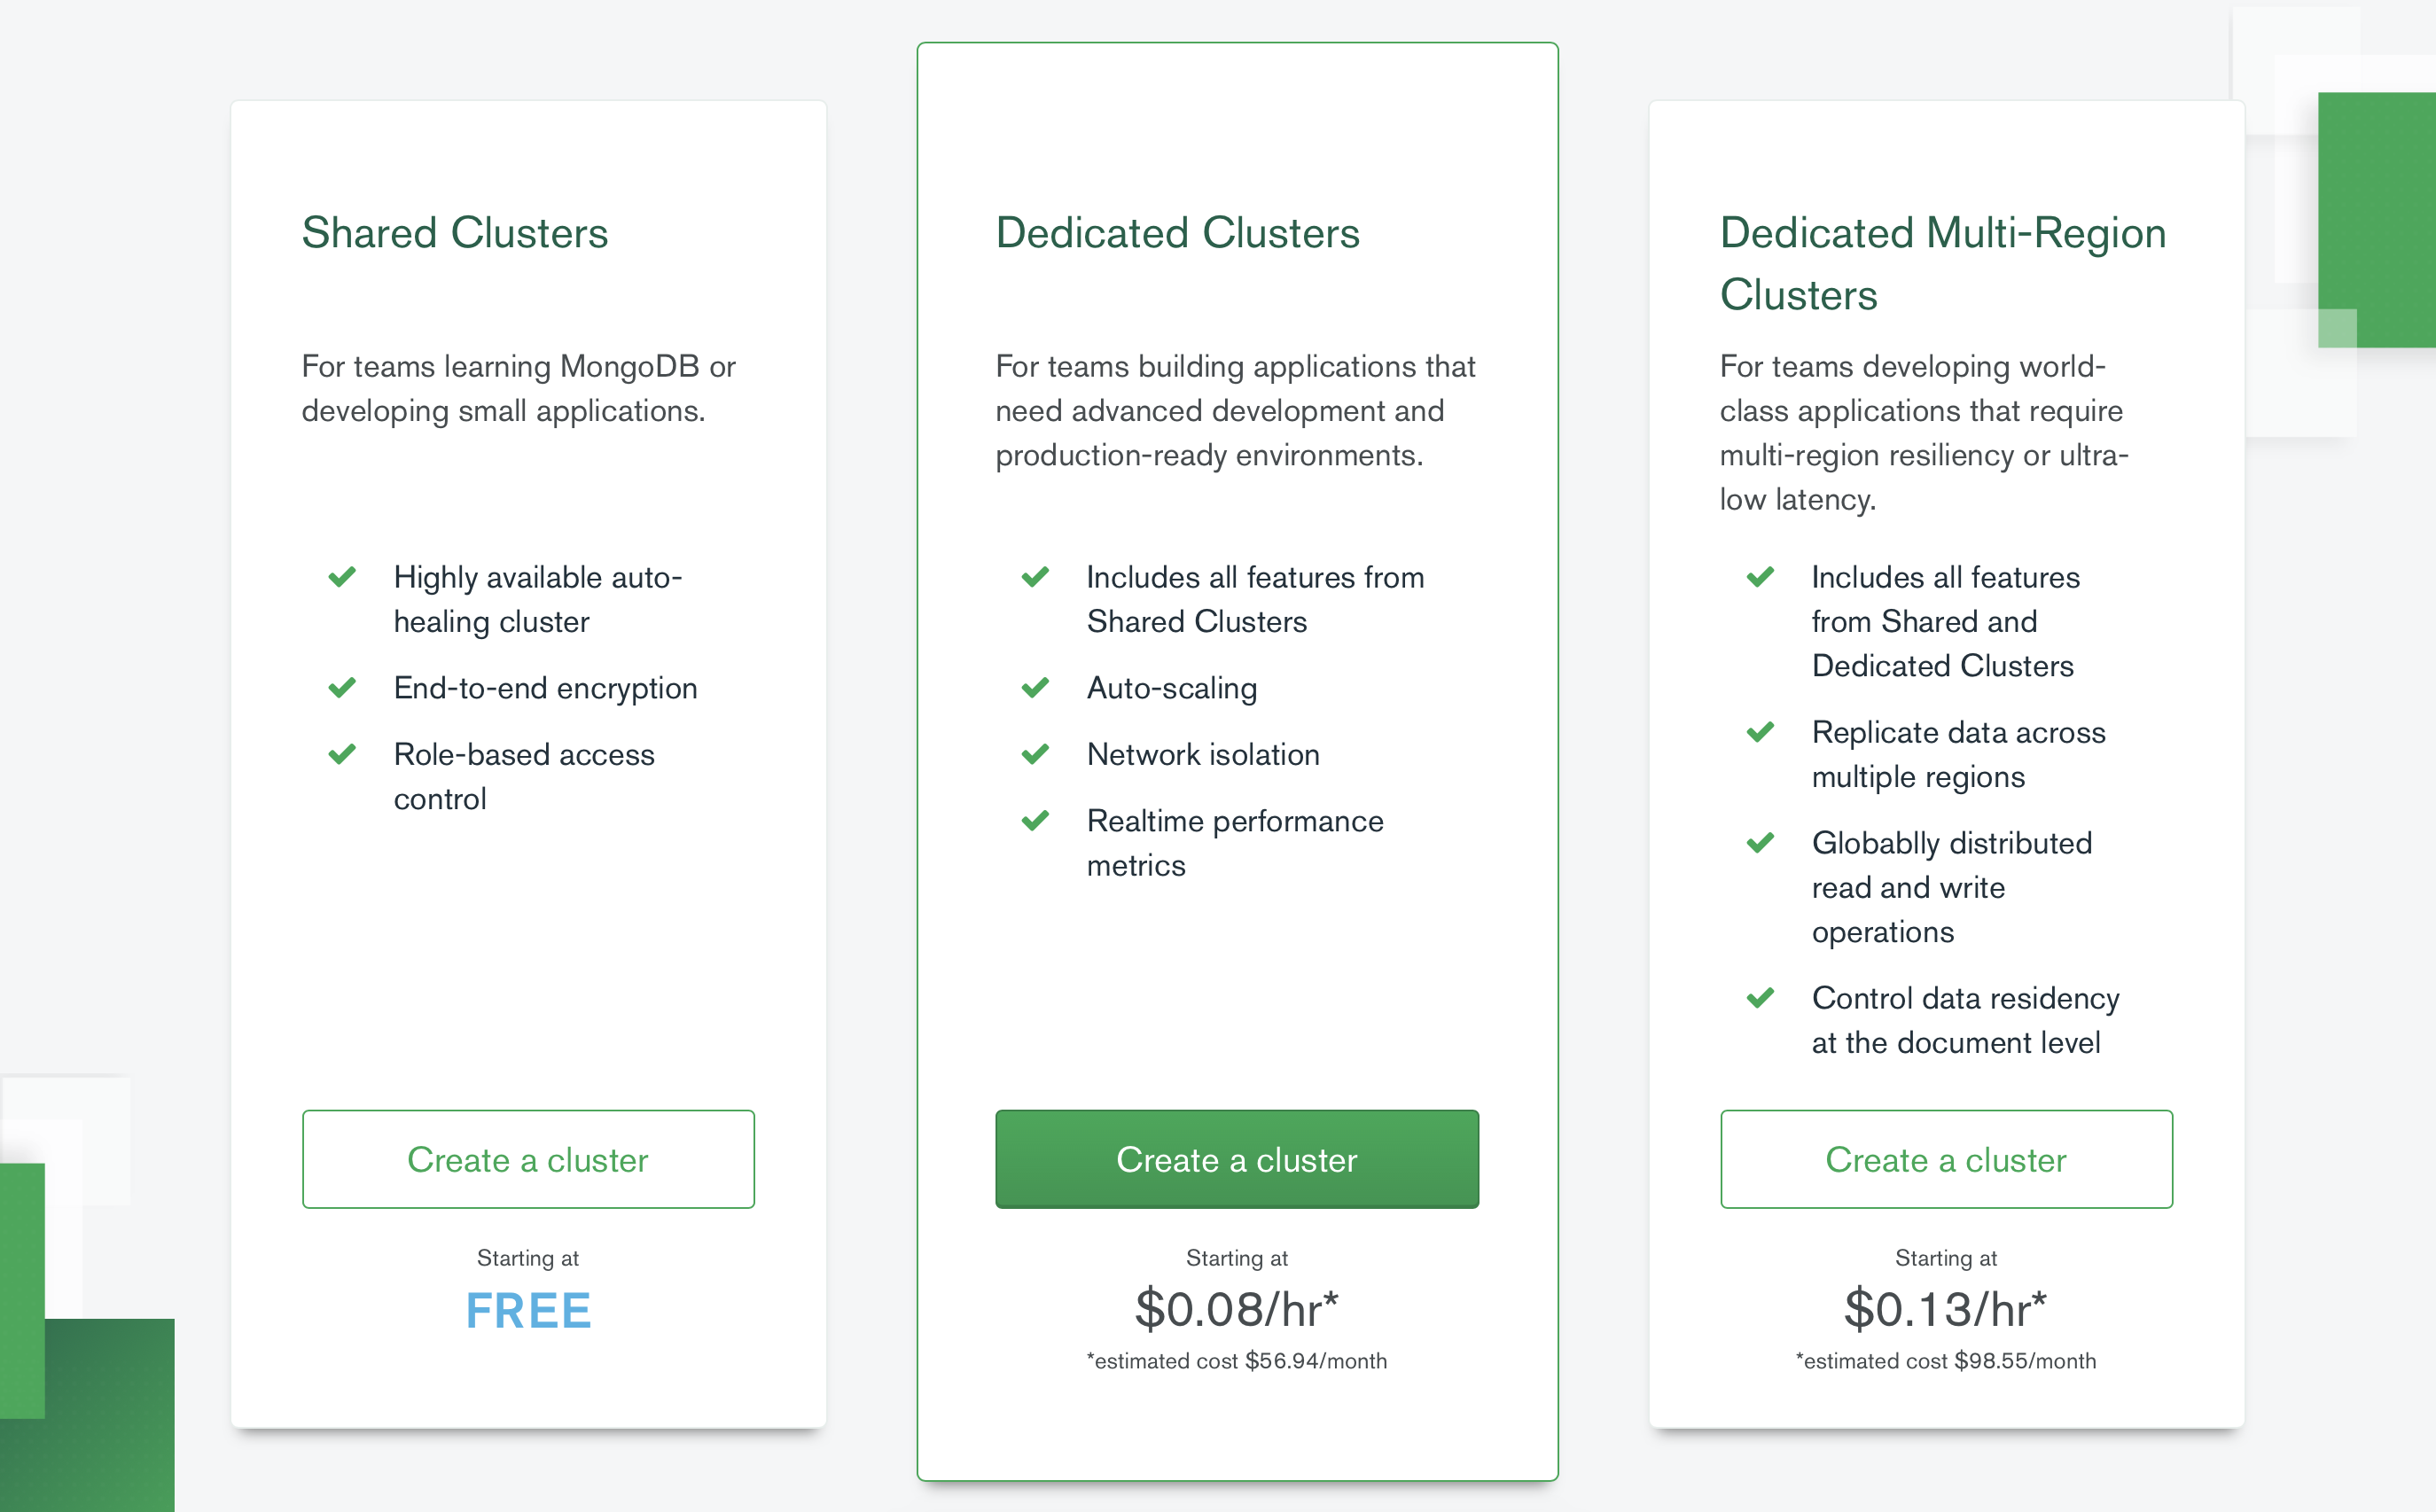
Select the free cluster (left option) and continue. You should now see a screen to configure a cluster. Scroll down. Make sure you see these two things:
- Cluster Tier is M0 Sandbox
- Monthly Estimate is FREE
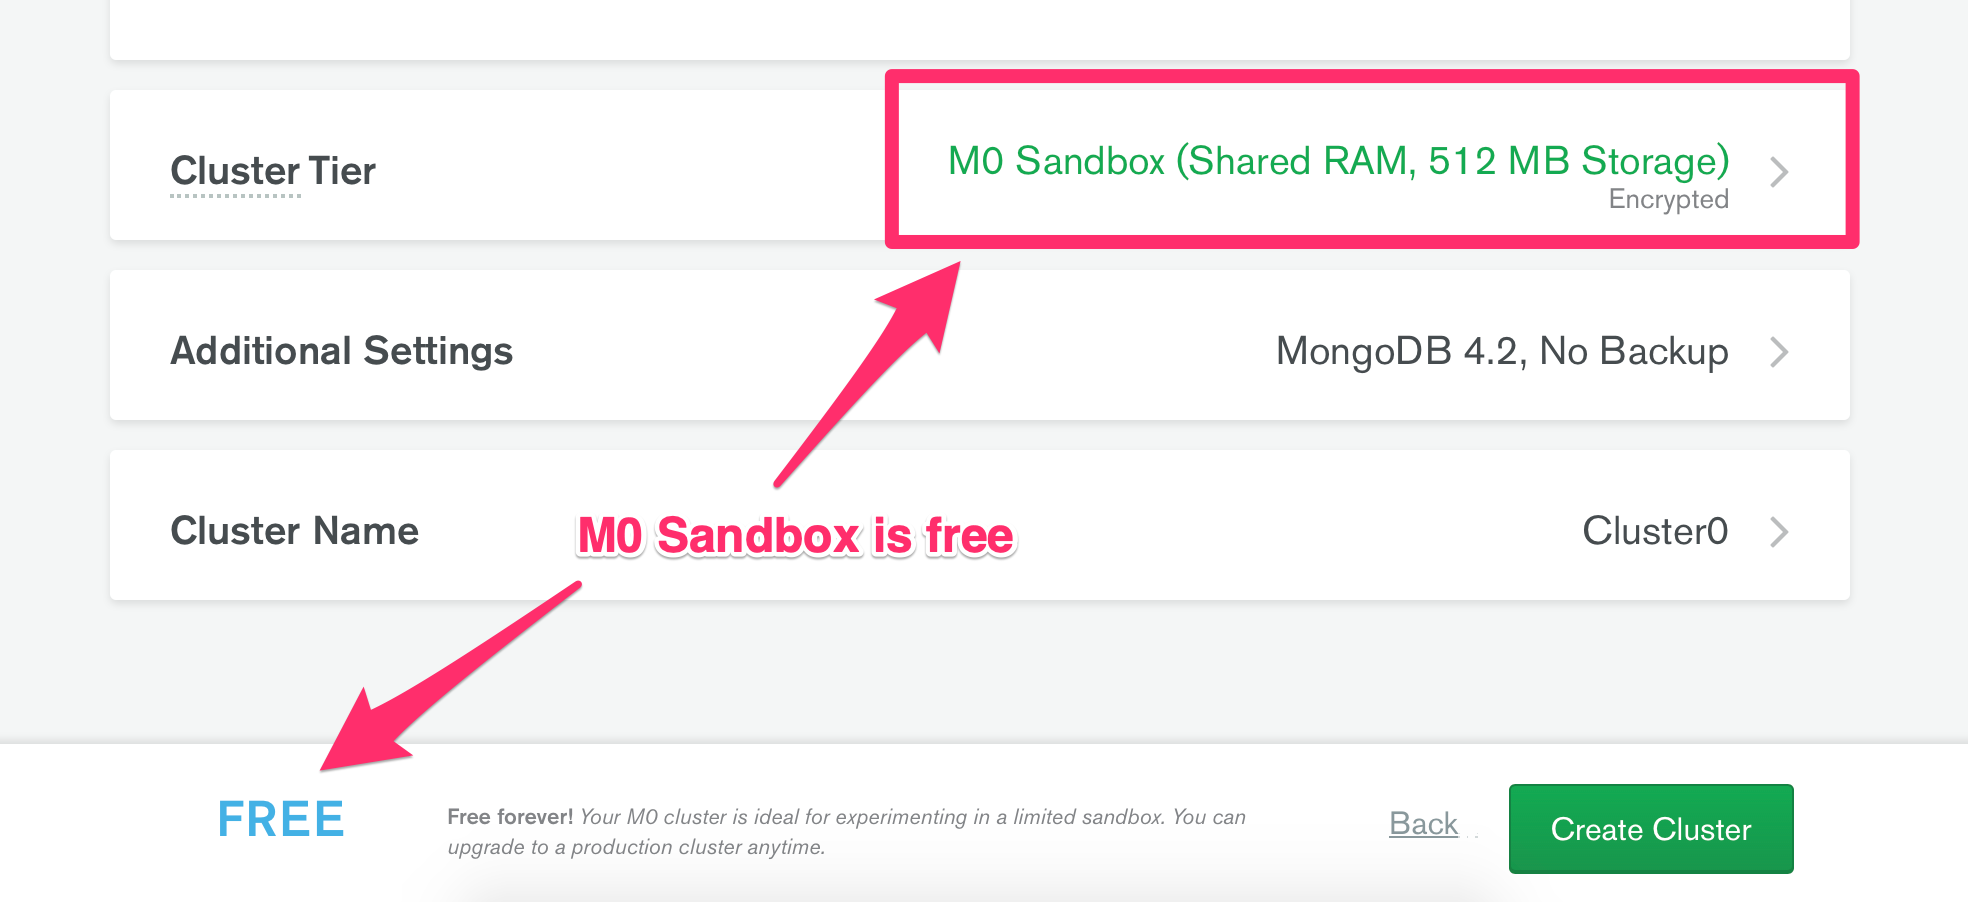
Click on Create cluster next. You should see “Your cluster is being created”.
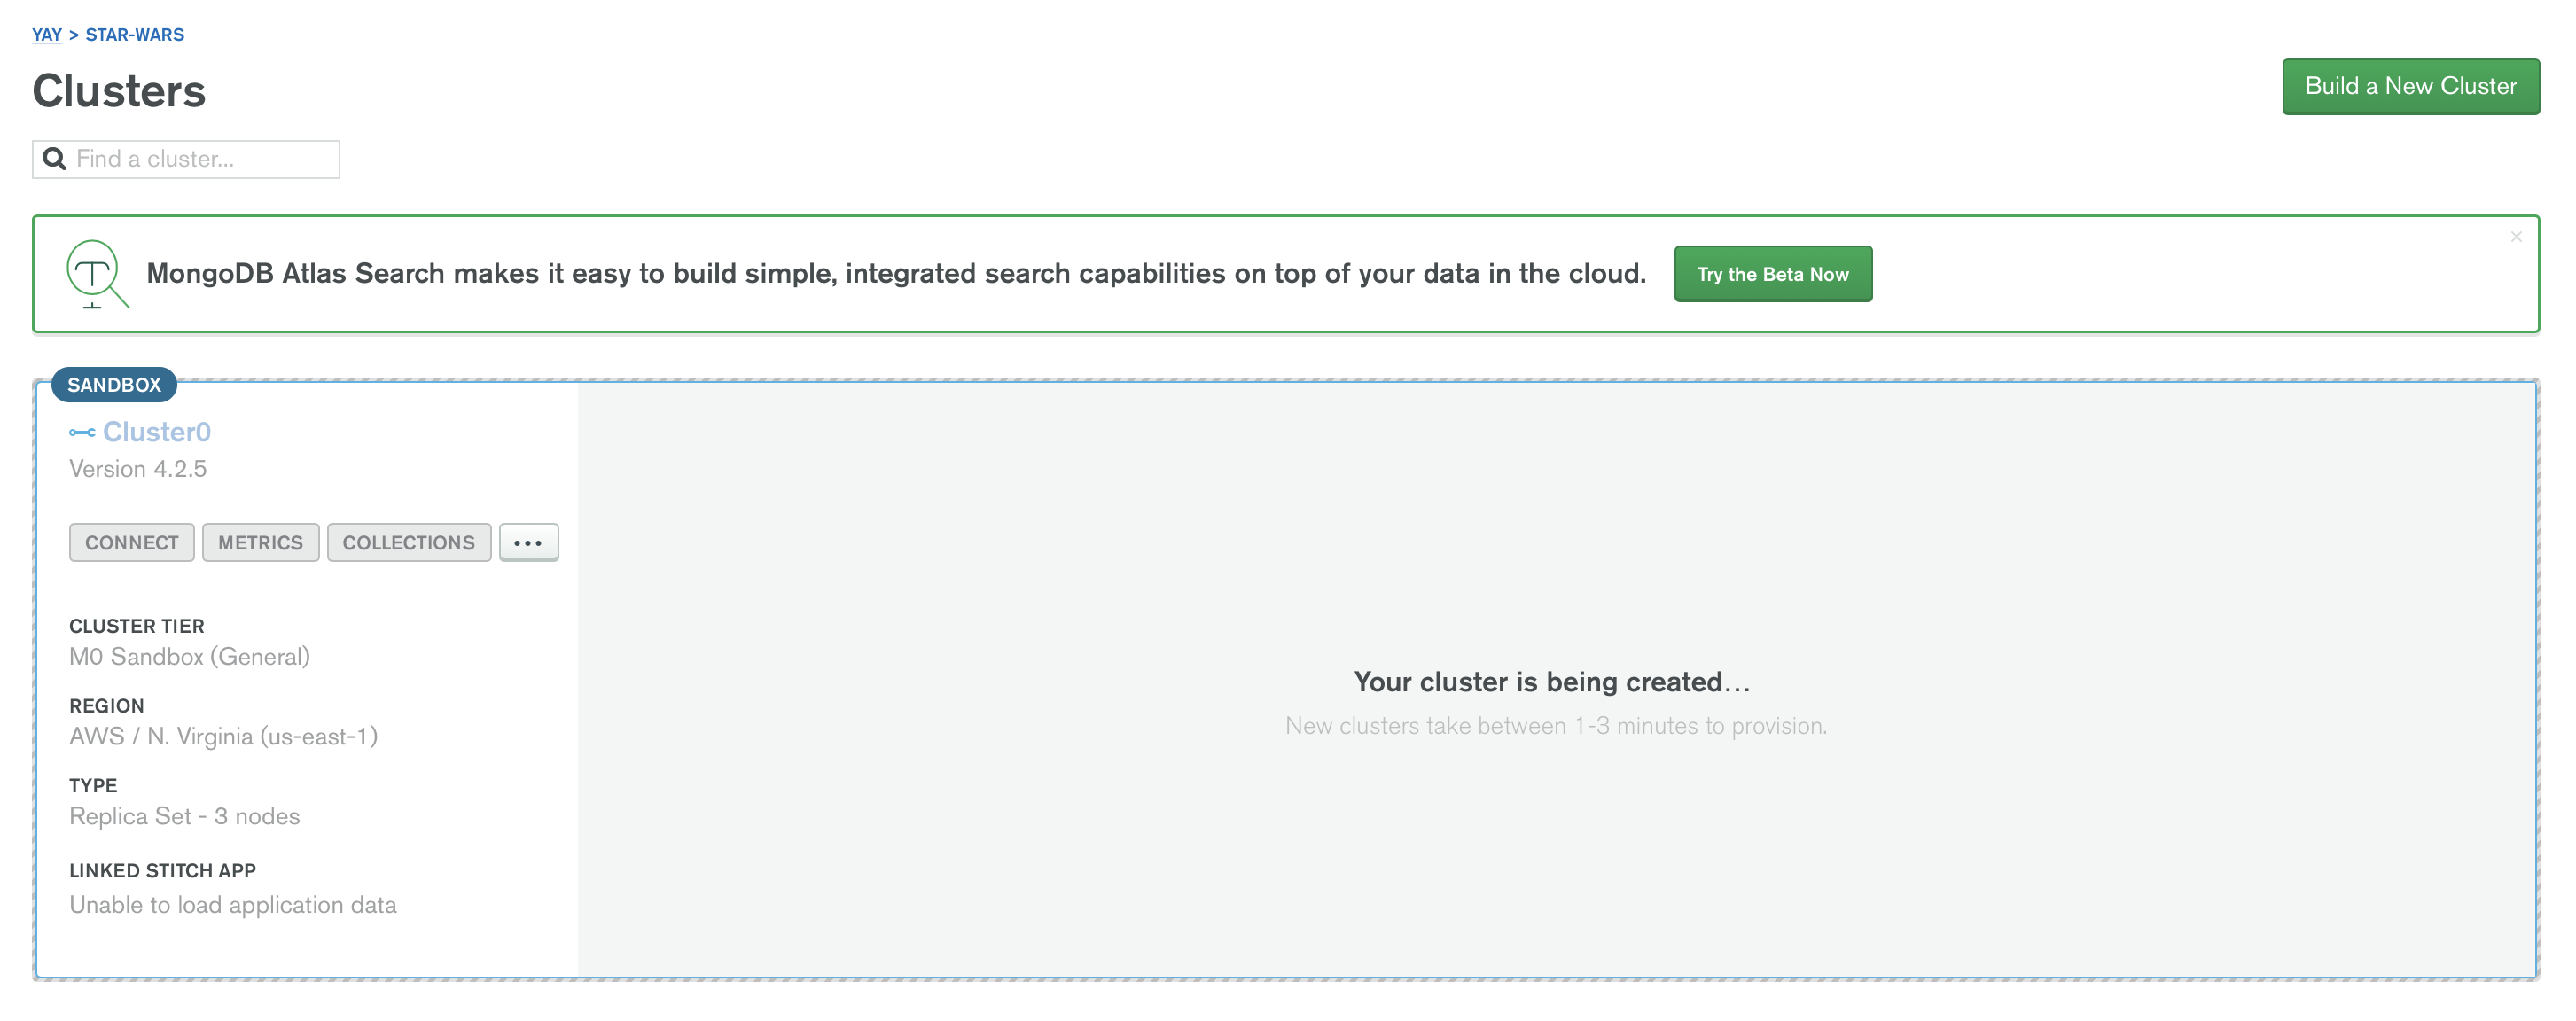
You have to wait for approximately 5 minutes for the cluster creation. When the cluster is ready, you’ll see this:
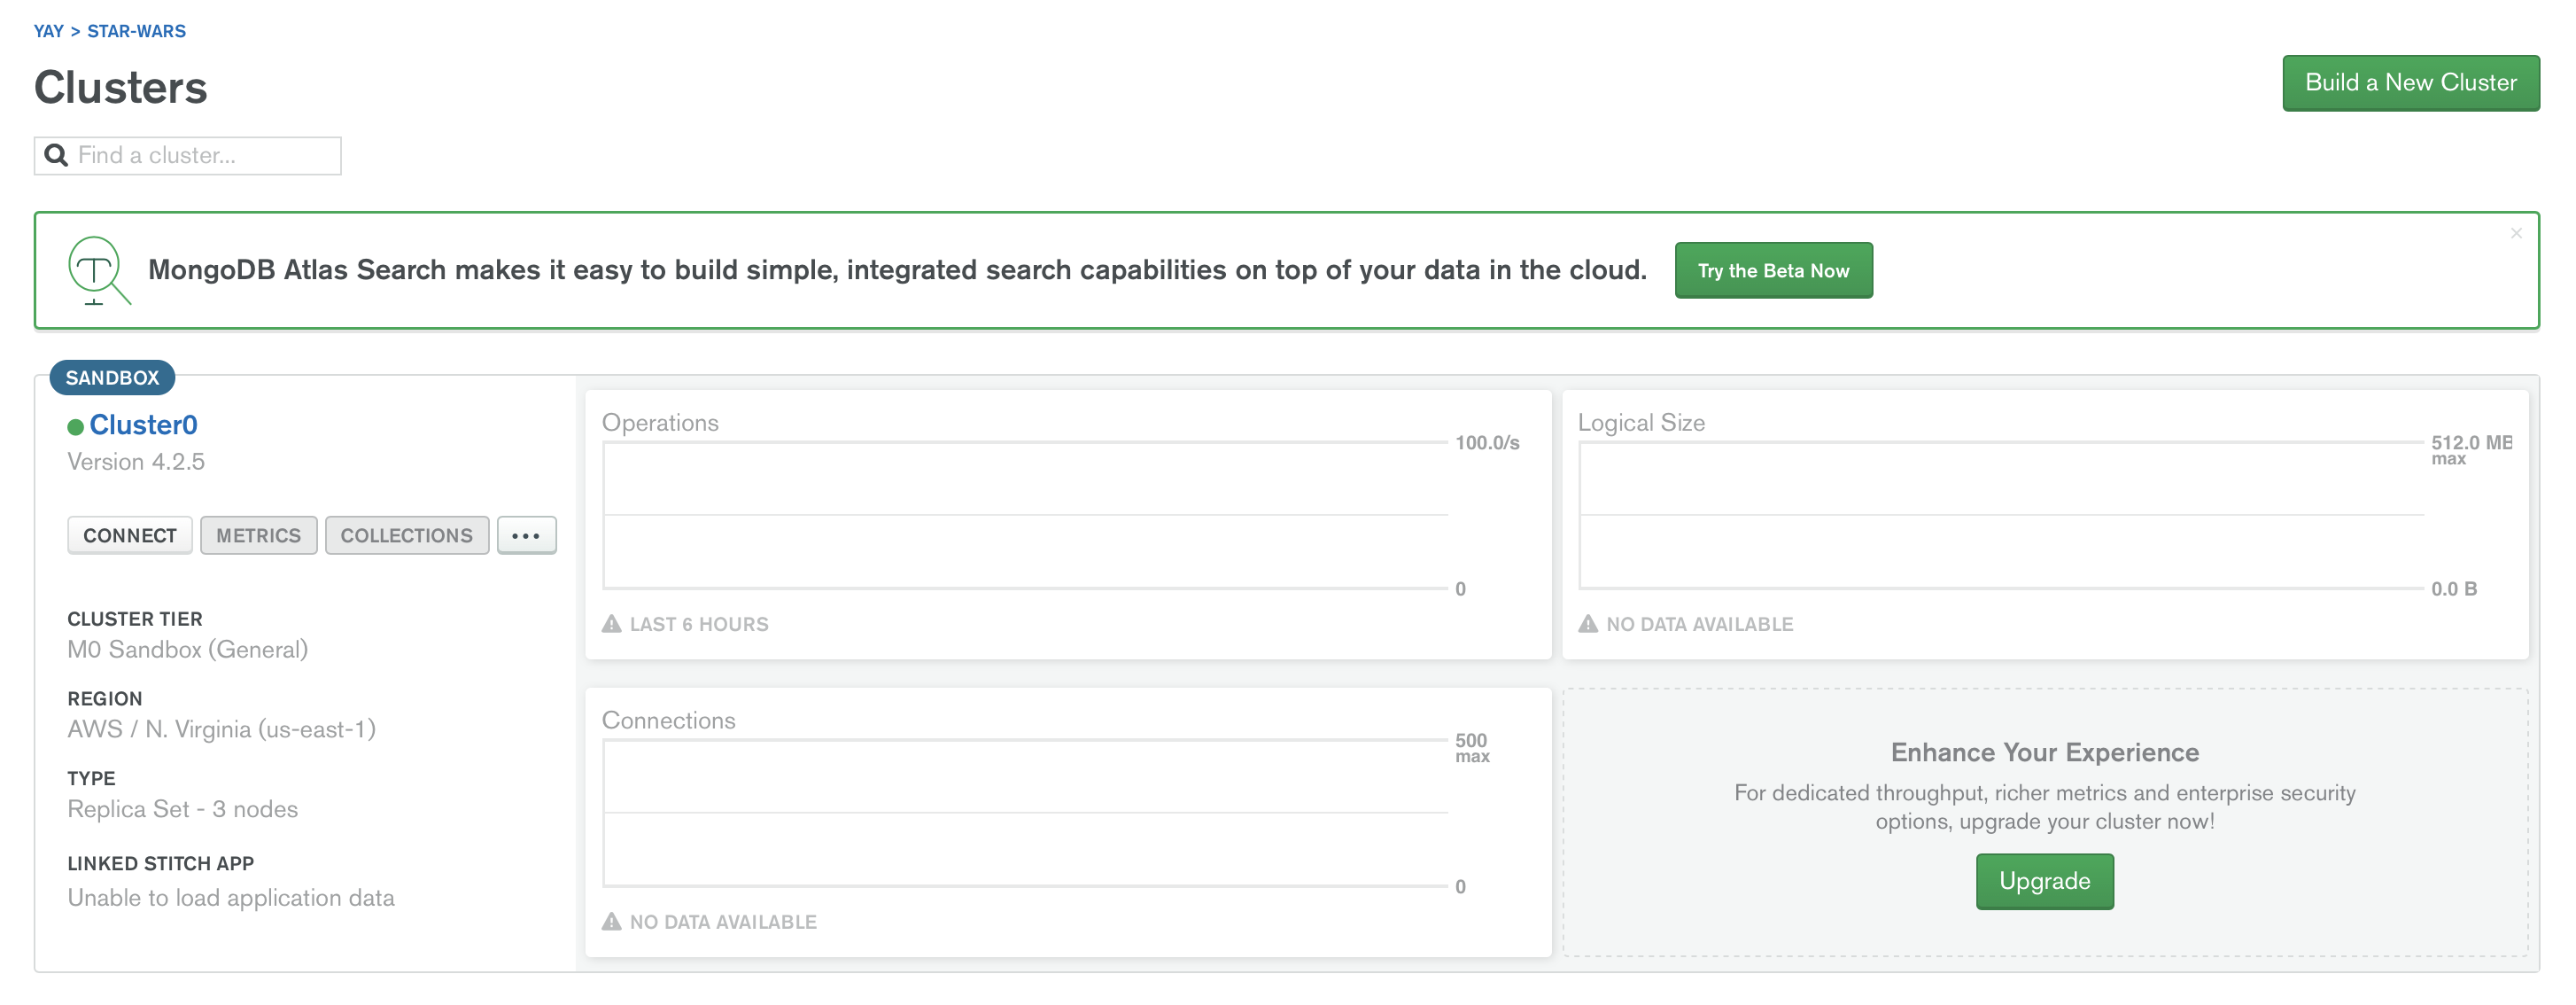
Now, we need to connect our Star Wars app with this cluster.
Connecting to MongoDB Atlas
Click on the Connect button.
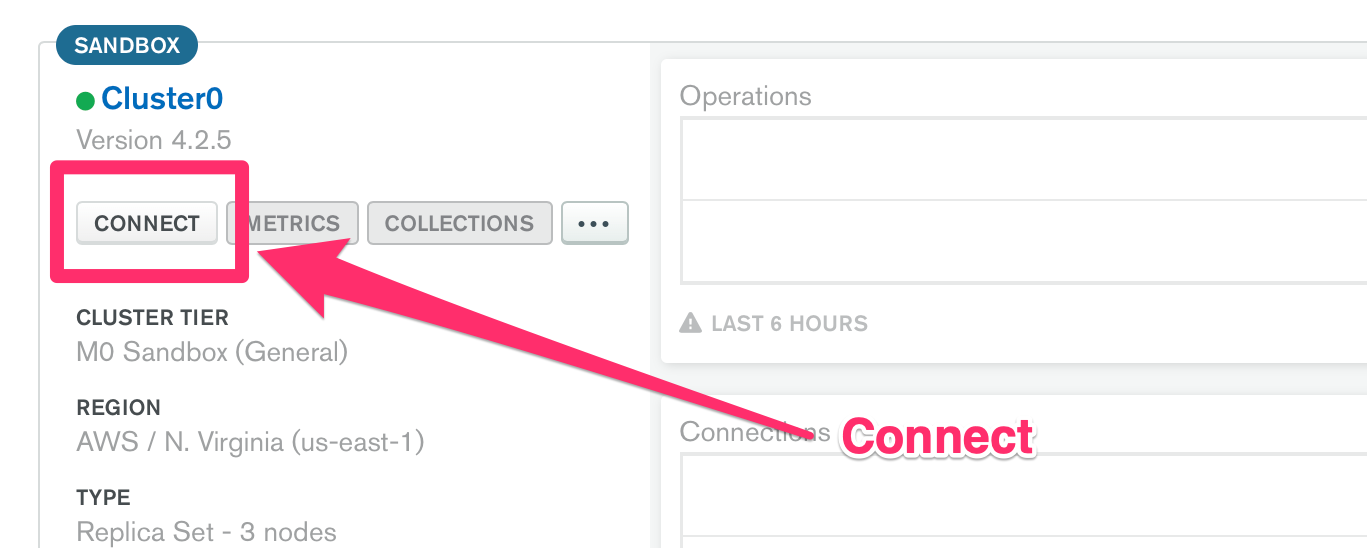
A modal should pop up.

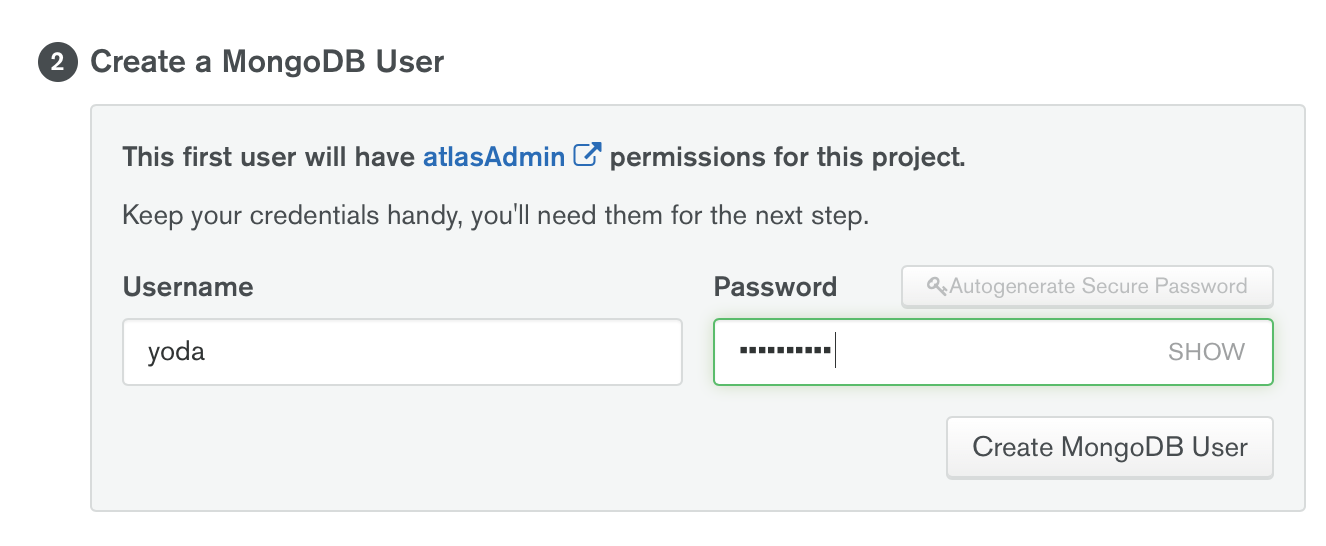
You need to whitelist your IP address before you can connect to your cluster. This is a security feature built into MongoDB Atlas. Go ahead and click “Add your Current IP Address”.

Next, you need to create a MongoDB user. This username and password is different from the one you used to login to MongoDB Atlas. This username and password is used ONLY for the database.
Make sure you remember MongoDB user and password. We’ll use it to connect to the database.
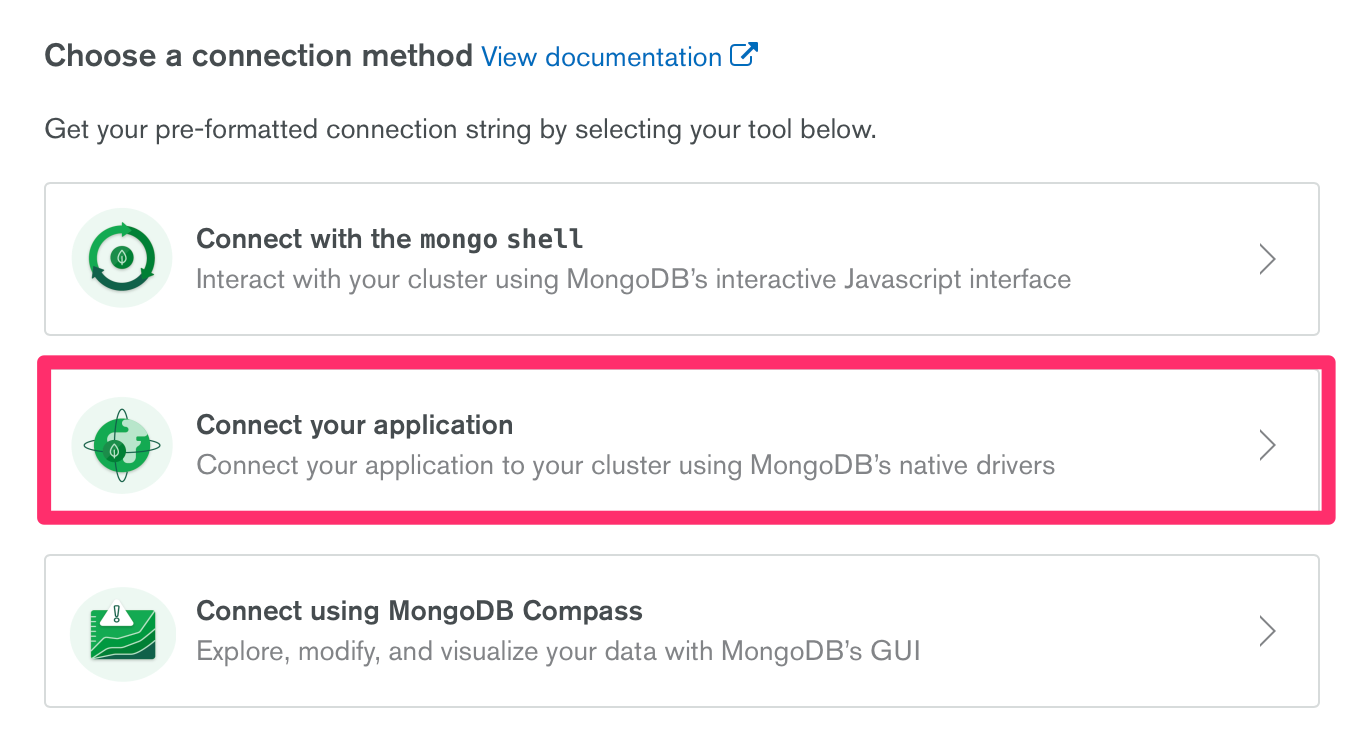
Next, click on choose your connection method. Select “Connect to your application” and copy the connection string.
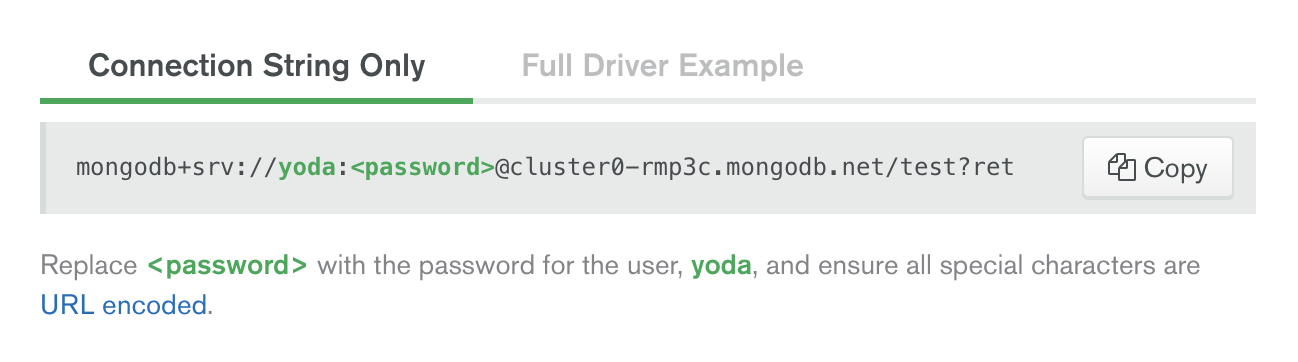
The connection string should look something like this:
'mongodb+srv://<username>:<password>@<clustername>-rmp3c.mongodb.net/test?retryWrites=true&w=majority'You need to replace 2 things here:
- Replace
<username>with your Database username - Replace
<password>with the Database user’s password
The test in the connection string points to a test database. You would
need to replace test with the name of your database if you use Mongoose. You
can leave it as test if you use MongoClient like what we’re doing in this
tutorial.
Put this connection string inside the MongoClient.connect.
MongoClient.connect(connectionString) .then // ... do something here ()We know we’ve connected to the database if there are no errors. Let’s create console.log statement that says “Connected to database”. This will help us know we’ve connected to the database when we restart the server.
MongoClient.connect(connectionString) .then(console.log('Connected to Database')) .catch(error => console.error(error))You should see something like this:

Read this article if you want to learn about promises in JavaScript.
Changing the Database
We need to change the database from test to something else. You can name it anything you want. I chose to name my new database star-wars-quotes because it helps me remember what I’m building.
MongoClient.connect(connectionString).then( console.log('Connected to Database') const db = client.db('star-wars-quotes'))MongoDB and Server
We need the db variable from the connection to access MongoDB. This means we need to put our express request handlers into the MongoClient’s then call.
MongoClient.connect(/* ... */) .then(client => { // ... const db = client.db('star-wars-quotes') app.use(/* ... */) app.get(/* ... */) app.post(/* ... */) app.listen(/* ... */) }) .catch(console.error)We can finally store Yoda’s quote into the database now!
CRUD - CREATE (continued)
We need to create a collection before we can store items into a database. Here’s a simple analogy to help you clear up the terms in MongoDB:
- Imagine a Database is a Room.
- A Room contains boxes (
collections).
Like Databases, you can name collections anything you want. In this case, let’s store quotes into a quotes collection. We use db.collection to specify the collection.
MongoClient.connect(/* ... */).then(client => {  // ...  const db = client.db('star-wars-quotes')  const quotesCollection = db.collection('quotes')
  // ...})
We can use the insertOne method to add items into a MongoDB collection.
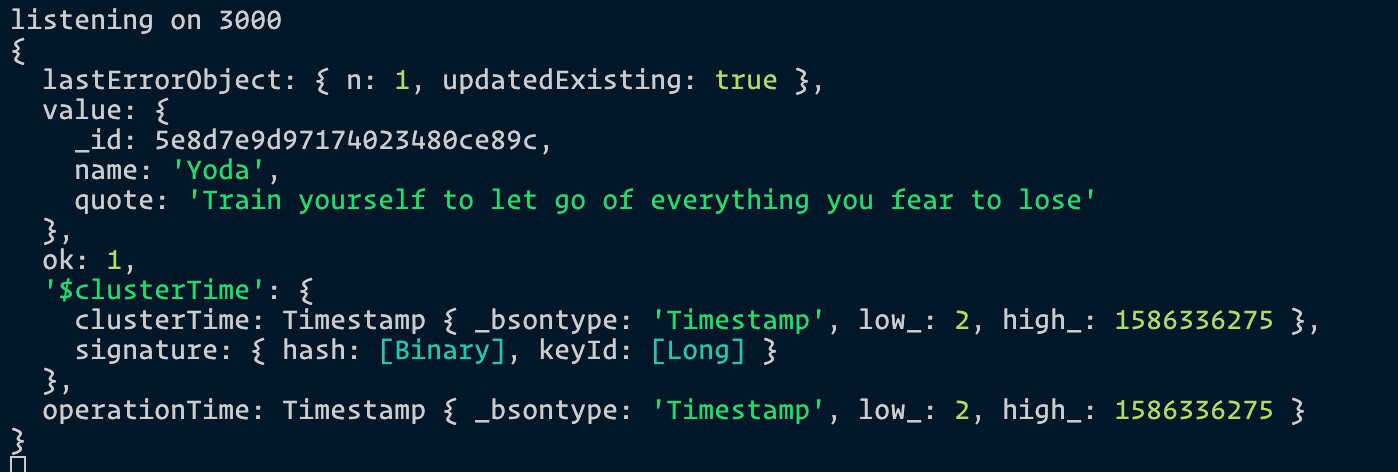
app.post('/quotes', (req, res) => { quotesCollection .insertOne(req.body) .then(result => { console.log(result) }) .catch(error => console.error(error))})Try submitting the <form> from the browser. You should see a big scary looking result in the Terminal.
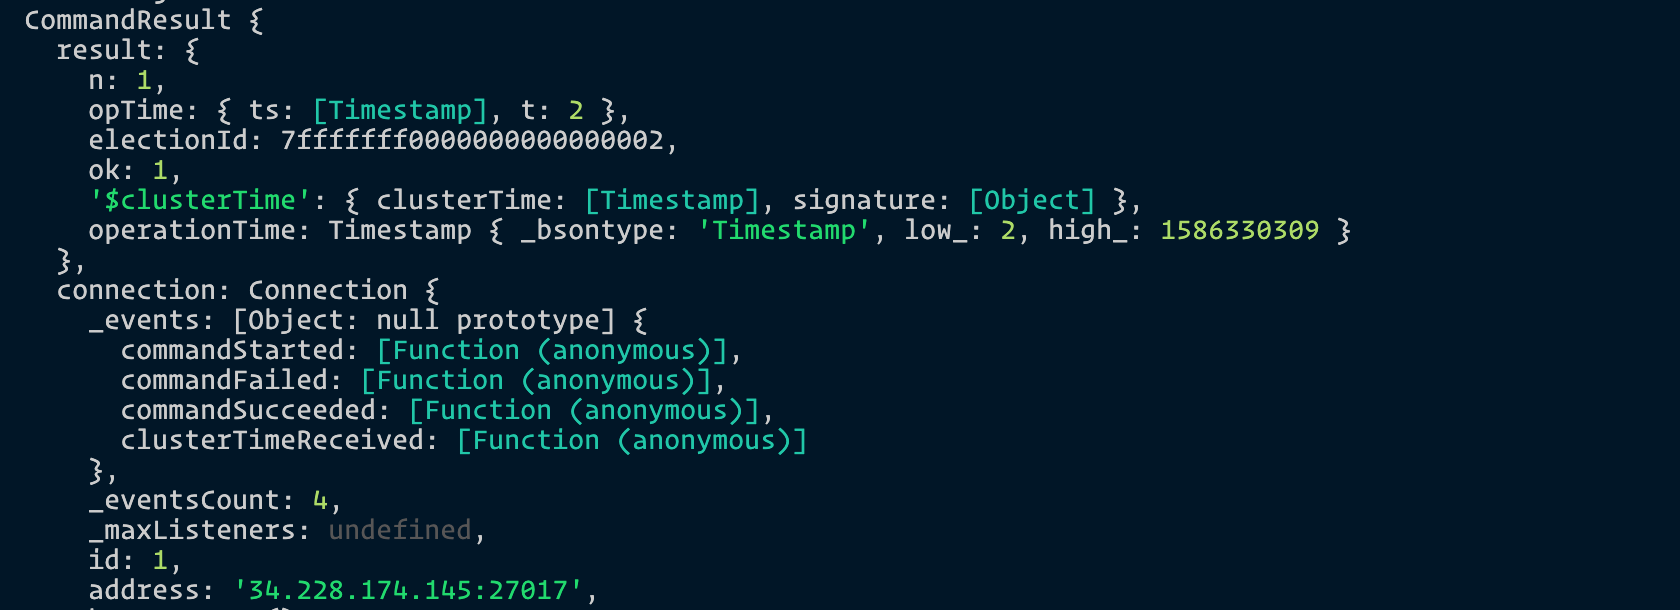
If you see this, congratulations! You’ve successfully added the quote into the database.
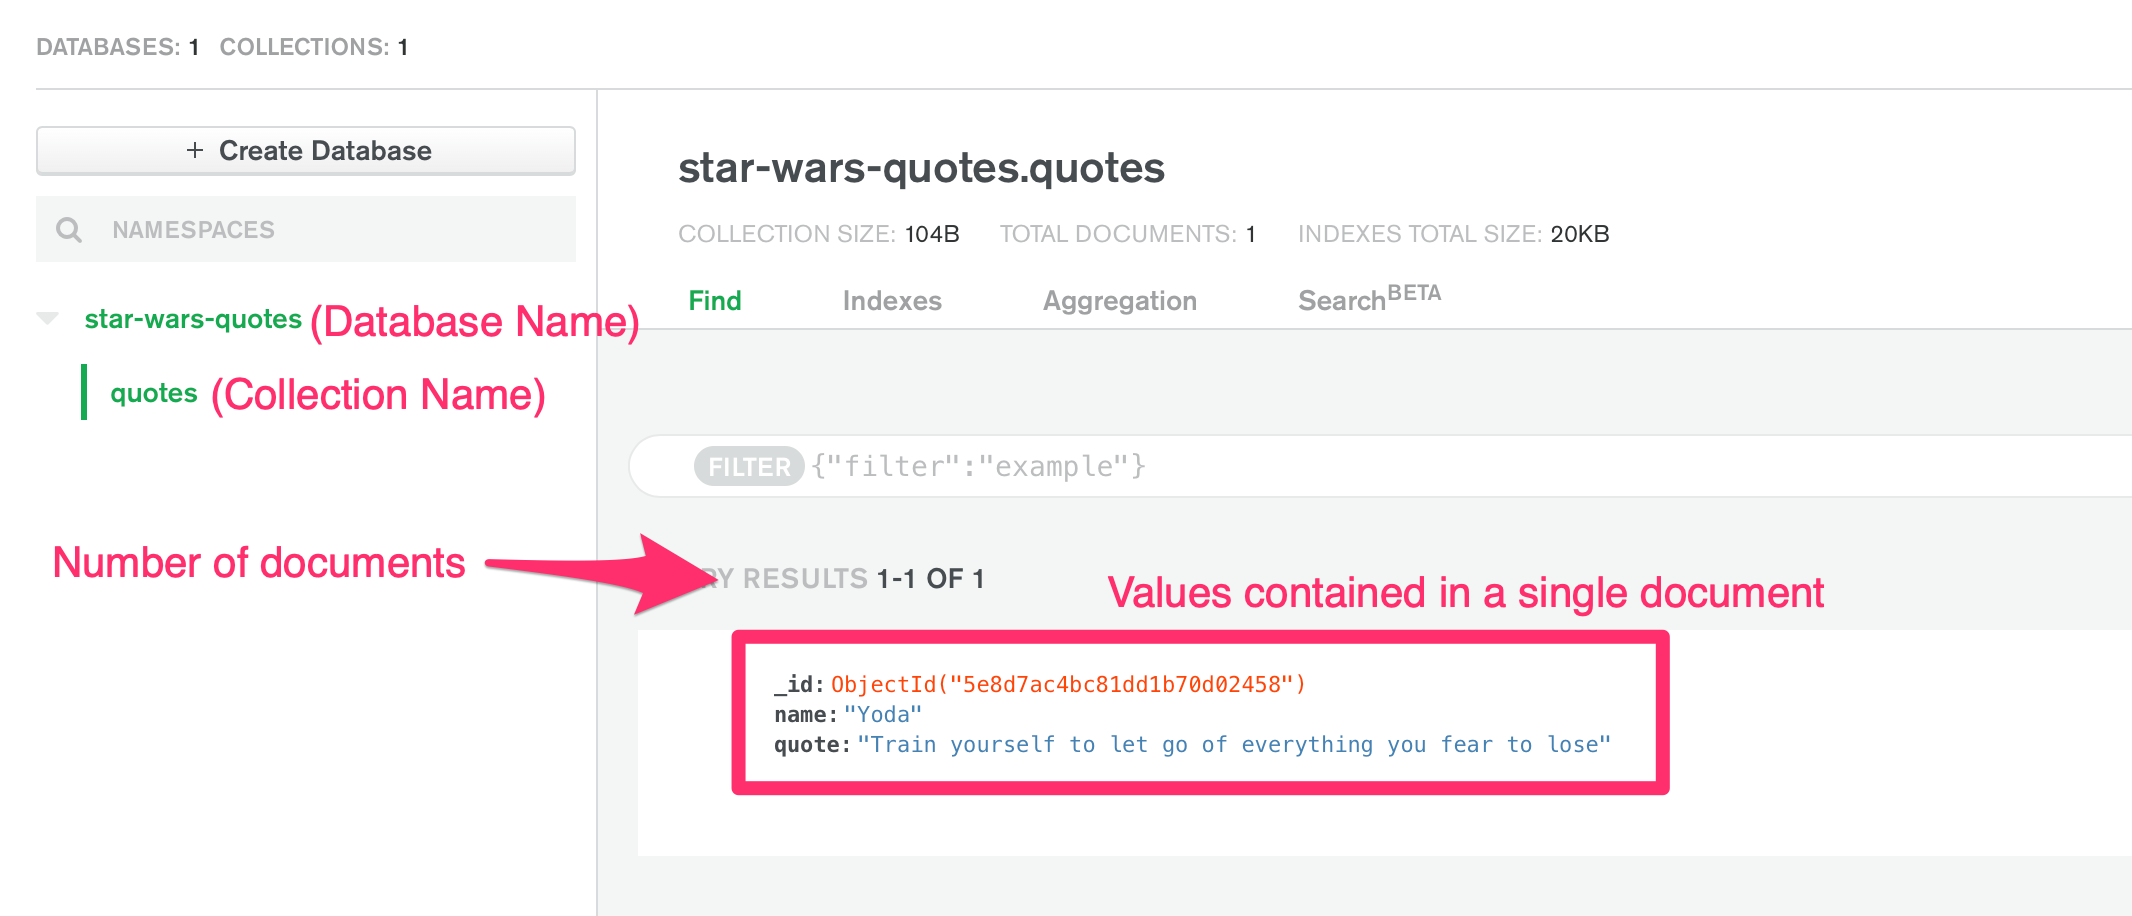
You can check the items inside the database by going to “Collections” in MongoDB Atlas.
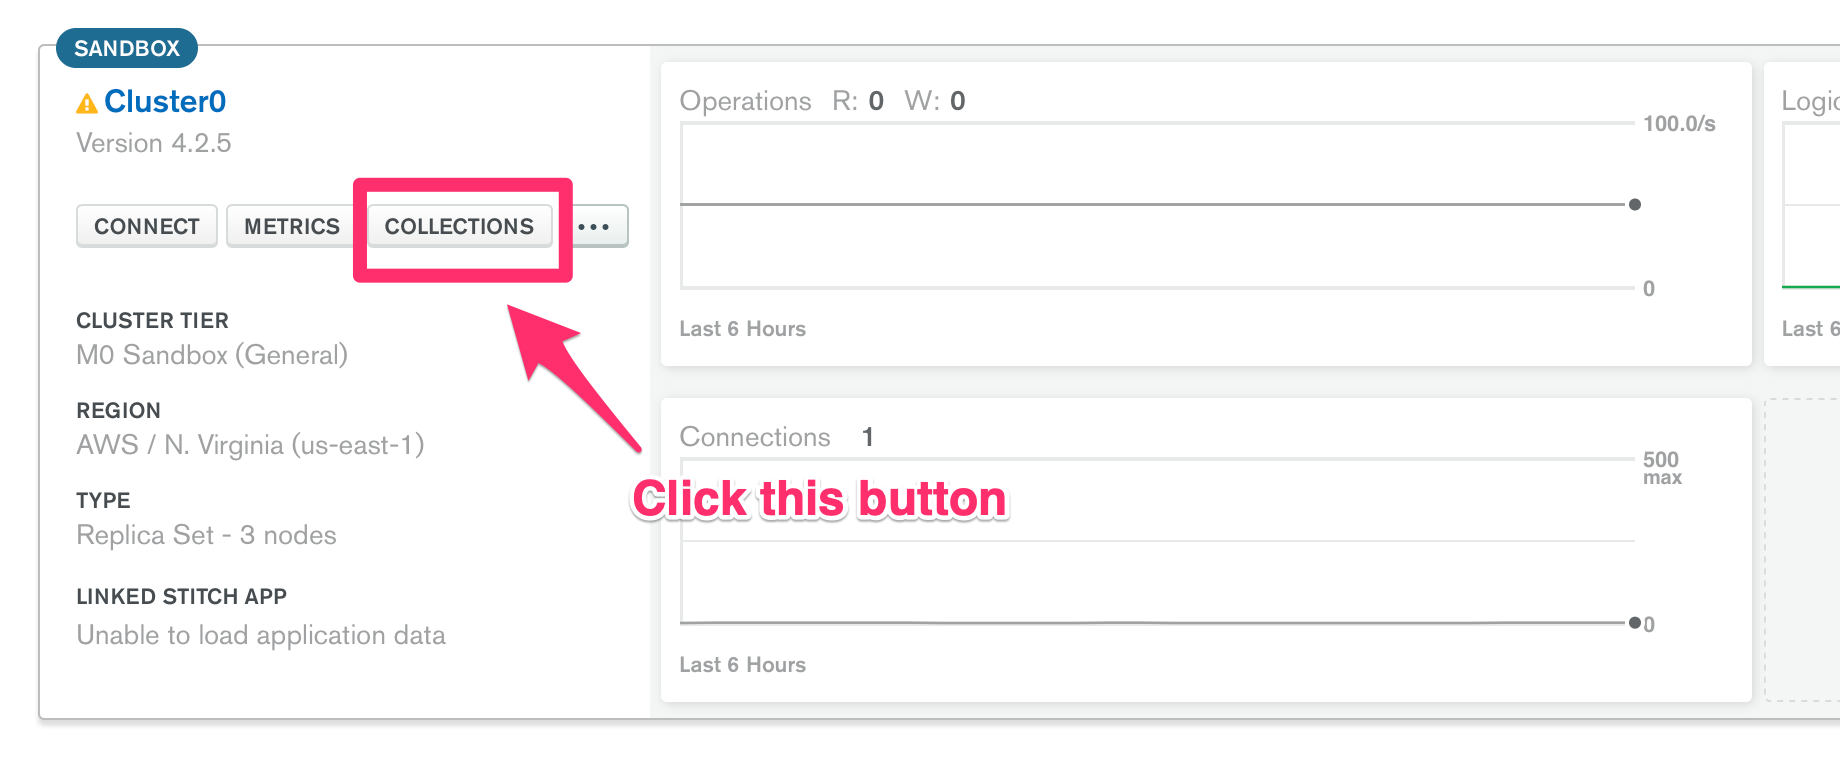
You should see a document in your database. (Each database entry is called a document).
If you go back to the Browser, you’ll see it’s still trying to load something.
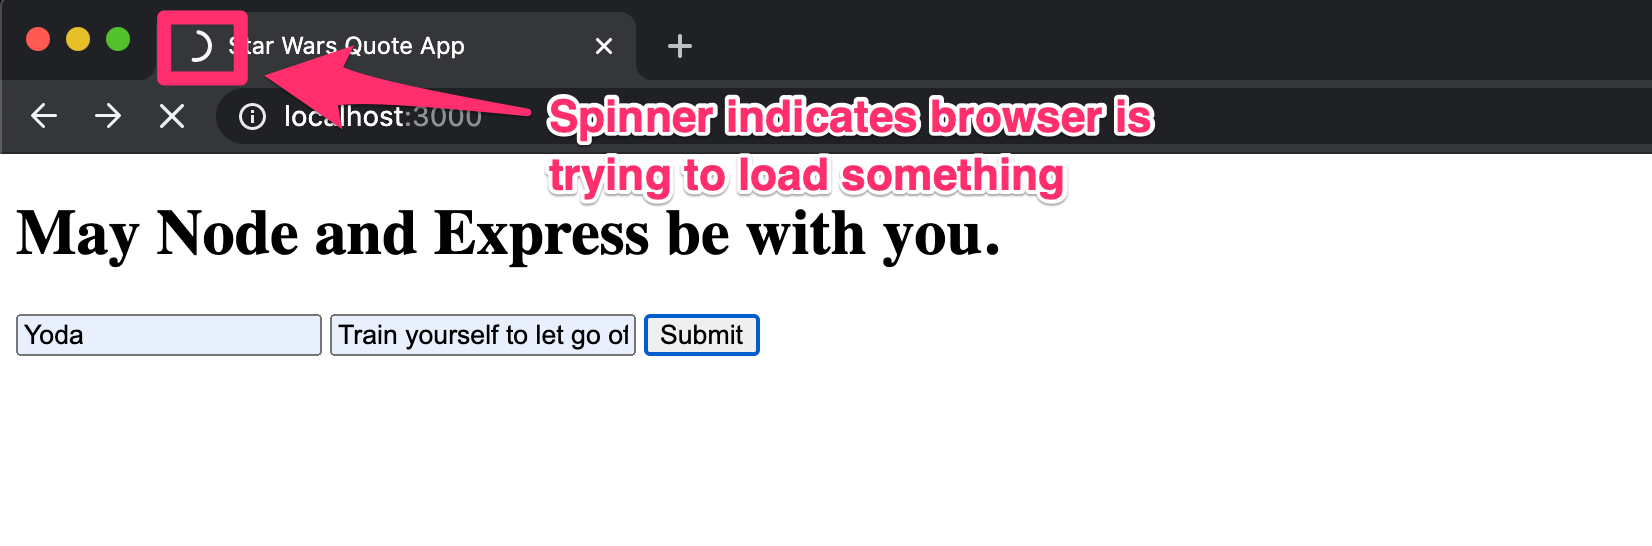
This happens because the browser expects something back from the server.
In this case, we don’t need to send the browser information. Let’s ask the browser to redirect back to / instead. We do this with res.redirect.
app.post('/quotes', (req, res) => { quotesCollection .insertOne(req.body) .then(result => { res.redirect('/') }) .catch(error => console.error(error))})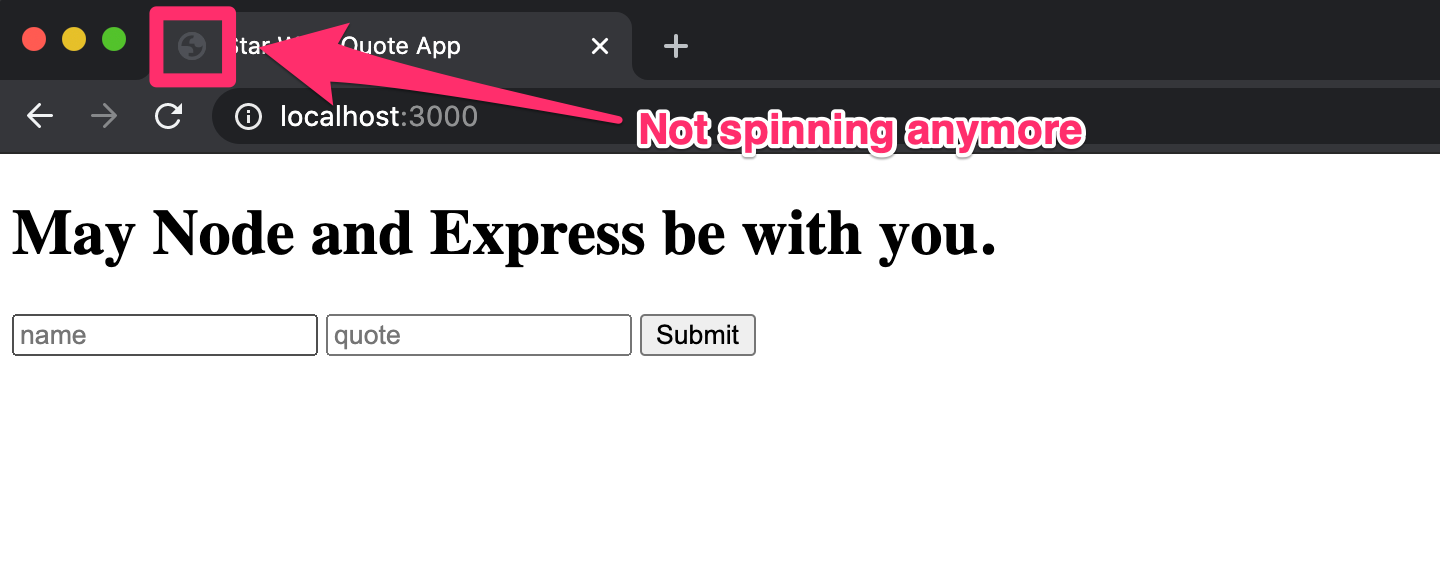
Yay!
Since we have some quotes in the collection, let’s show them to our user when they land on the page!
Showing quotes to users (READ operation)
We need to do two things to show quotes from MongoDB Atlas to our users.
- Get quotes from MongoDB Atlas.
- Rendering the quotes in HTML with a template engine
Let’s go one step at a time.
Getting quotes from MongoDB
We can get quotes we stored in MongoDB with the find method. This method from mLab by using the find method that’s available in the collection method.
app.get('/', (req, res) => { const cursor = db.collection('quotes').find() console.log(cursor) // ...})The find method returns a cursor which won’t make sense if you tried logging it.
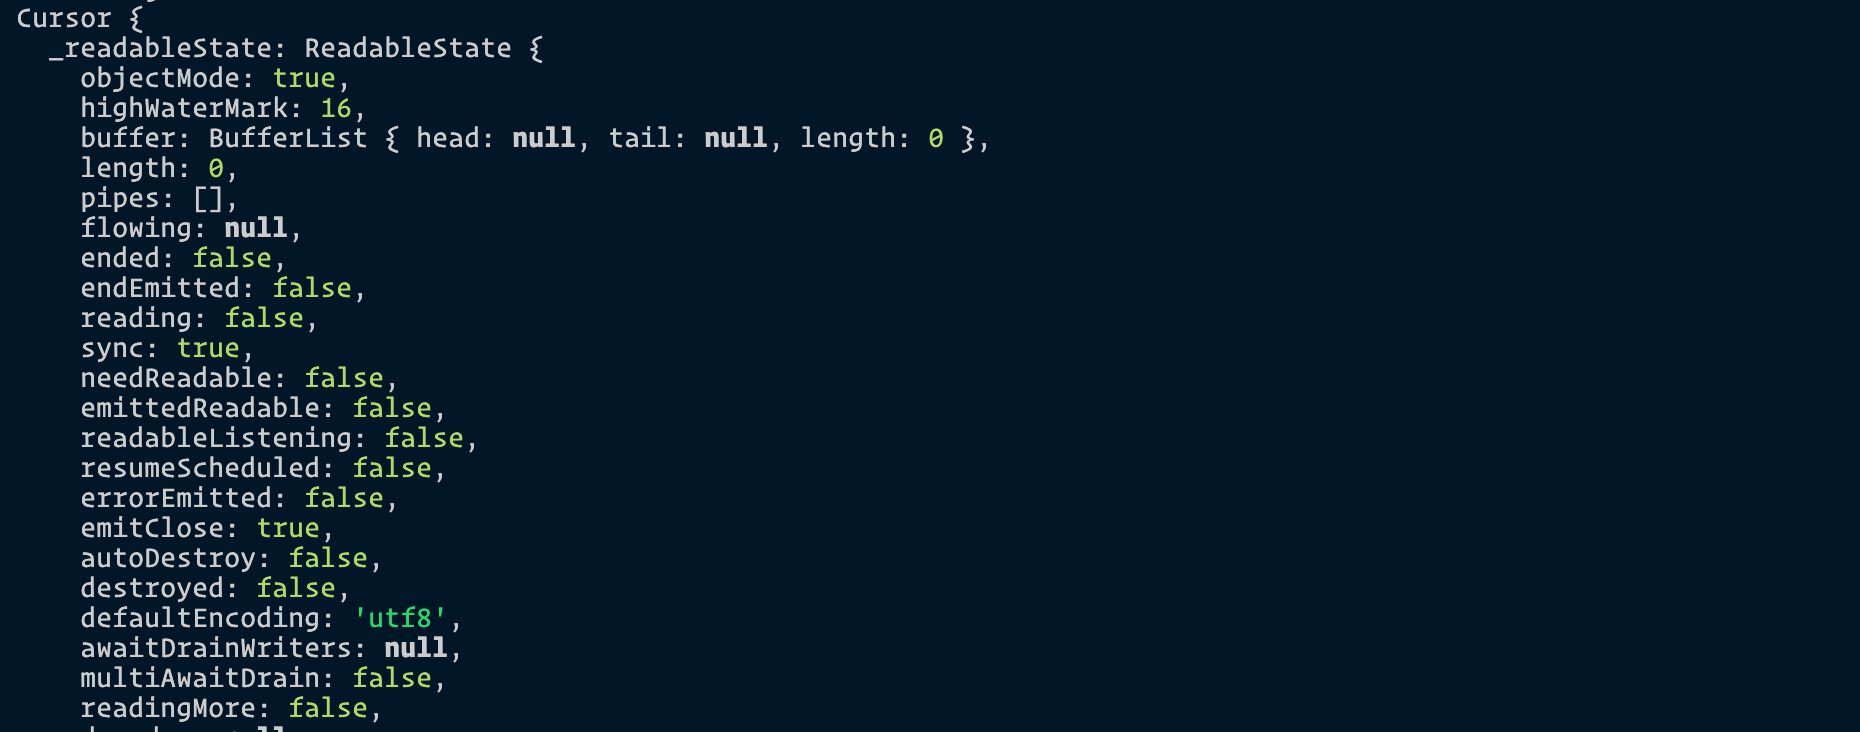
But this cursor object contains all quotes from our database! It has a bunch of method that lets us get our data. For example, we can use toArray to convert the data into an array.
app.get('/', (req, res) => { db.collection('quotes') .find() .toArray() .then(results => { console.log(results) }) .catch(error => console.error(error)) // ...})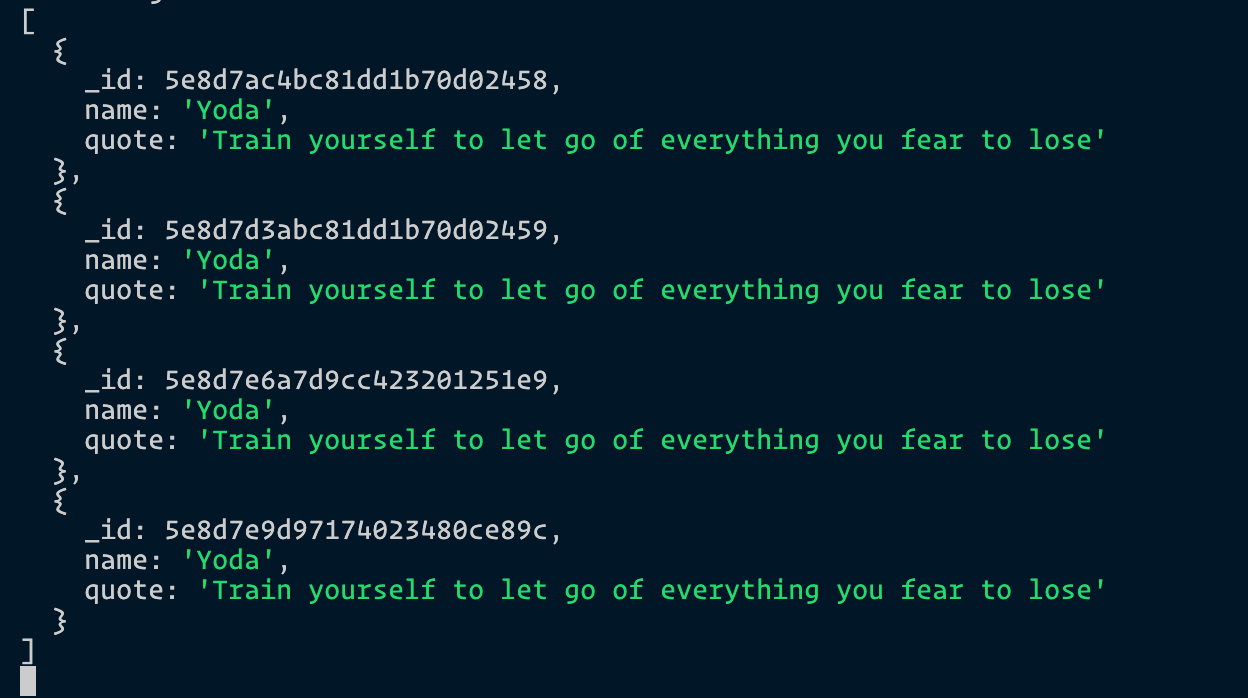
Great! We see the quotes we added! (You see so many of the same quotes because I added them all when writing this tutorial 😆).
Next we want to generate a HTML that contains all our quotes.
Rendering the HTML
We cannot serve up the index.html file and expect quotes to magically appear because there’s no way to add dynamic content to an HTML file.
What we can do, instead, is to use a template engine to generate the HTML. Popular template engines include Pug, Embedded JavaScript, and Nunjucks.
I’ve wrote extensively about the how and why of template engines in a separate post. You might want to check it out if you have no idea what template engines are.
I use Nunjucks as my template engine of choice. Feel free to check out the post to find out why.
For this tutorial, we will use Embedded JavaScript (EJS) as our template engine because it’s the easiest to start with. You’ll find it familiar from the get-go since you’ll be writing HTML and JavaScript.
Using EJS
First, we need to install EJS.
npm install ejsNext, we need to set view engine to ejs. This tells Express we’re using EJS as the template engine. You need to place it before any app.use, app.get or app.post methods.
app.set('view engine', 'ejs')
// Middlewares and other routes here...
We can now generate HTML that contains the quotes. This process is called rendering the HTML.
We will use the render method built into Express’s response. It needs to follow the following syntax:
res.render(view, locals)viewis the name of the file we’re rendering. This file must be placed inside aviewsfolder.localsis the data passed into the file.
Let’s create a view. We’ll make an index.ejs file inside the views folder.
mkdir viewstouch views/index.ejsWe’ll copy/paste everything from index.html into index.ejs.
<!-- index.ejs --><!DOCTYPE html><html lang="en">  <head>    <meta charset="UTF-8" />    <title>Star Wars Quote App</title>  </head>
  <body>    <h1>May Node and Express be with you.</h1>
    <form action="/quotes" method="POST">      <input type="text" placeholder="name" name="name" />      <input type="text" placeholder="quote" name="quote" />      <button type="submit">Submit</button>    </form>  </body></html>
Next, we’ll use res.render to render this index.ejs file.
app.get('/', (req, res) => { db.collection('quotes').find().toArray().then(/* ... */).catch(/* ... */) res.render('index.ejs', {})})If you refresh the page, you should still see the same thing. Nothing should change, nothing should break.
Let’s put the quotes into index.ejs. To do this, we need to pass the quotes into the render method.
app.get('/', (req, res) => { db.collection('quotes') .find() .toArray() .then(results => { res.render('index.ejs', { quotes: results }) }) .catch(/* ... */)})In index.ejs, we can use place variables between <%= and %> tags. Let’s try putting quotes into the HTML:
<!-- In index.ejs --><body> <h1>...</h1> <form>...</form> <%= quotes %></body>You should see this:
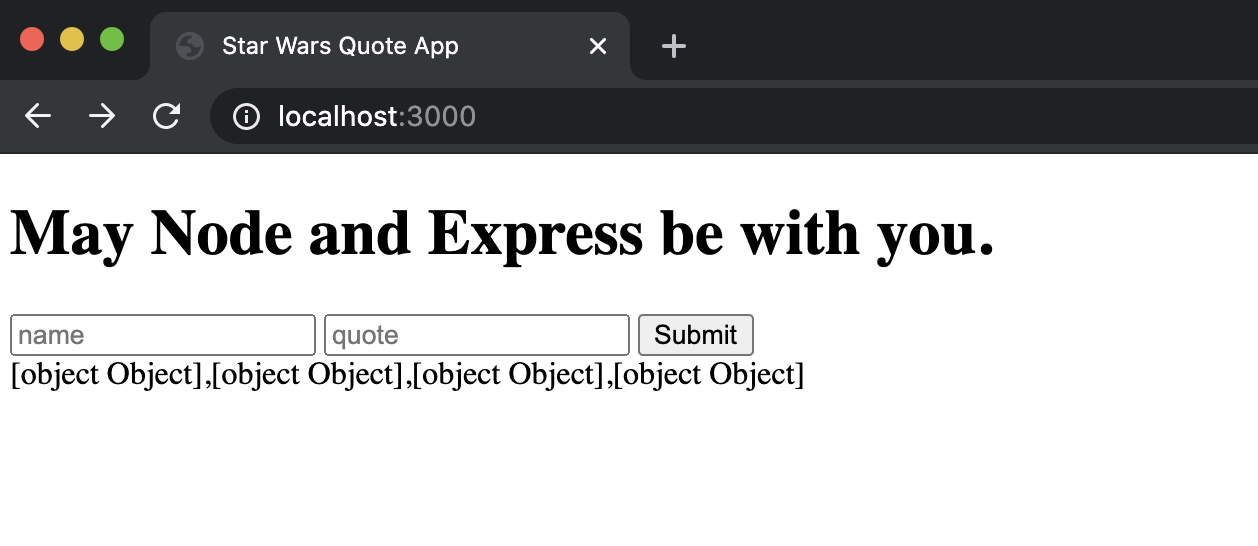
We see lots of [object Object] because each quote inside results is a JavaScript object. ejs cannot convert that object into HTML automatically.
We need to loop through the quotes. We can do this with a for loop. In EJS, we write a for loop like how we write a JavaScript for loop. The only difference is we need to put the for loop statements between <% and %>.
<h2>Quotes</h2>
<ul class="quotes">  <!-- Loop through quotes -->  <% for(var i = 0; i < quotes.length; i++) {%>  <li class="quote">    <!-- Output name from the iterated quote object -->    <span><%= quotes[i].name %></span>:    <!-- Output quote from the iterated quote object -->    <span><%= quotes[i].quote %></span>  </li>  <% } %></ul>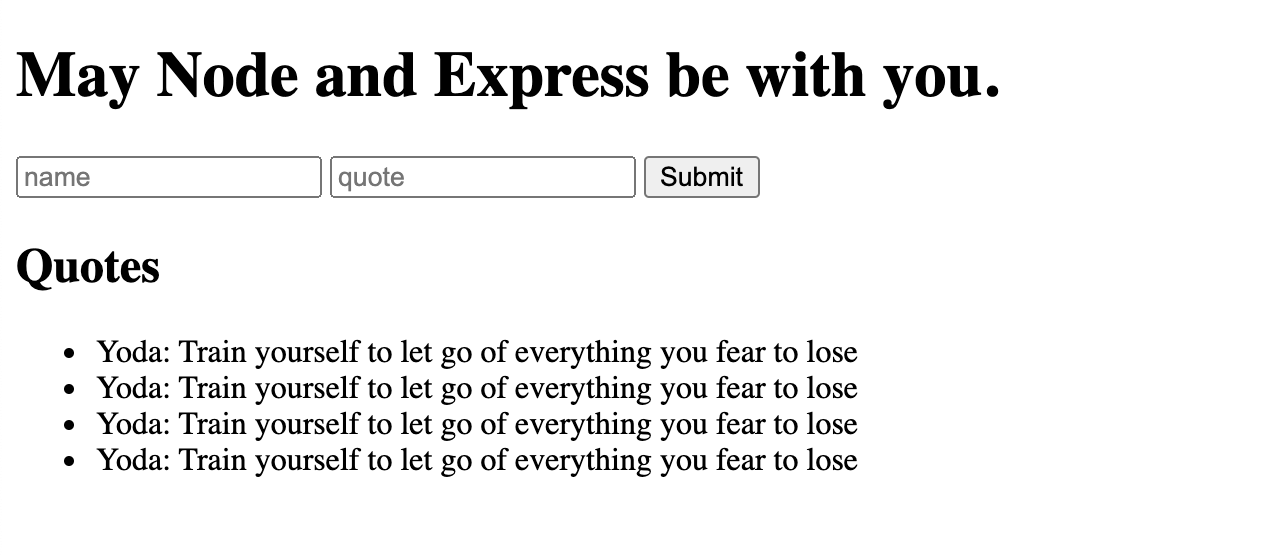
CRUD - UPDATE
We use the UPDATE operation when we want to change something. It can be triggered with a PUT request. Like POST, PUT can be triggered either through JavaScript or through a <form> element.
Let’s switch things up and use JavaScript since you already know how to use <form> elements.
For this update operation, we will create a button that replaces the first quote by Yoda to something written by Darth Vader.
To do this, we need to add a button into the index.ejs file:
<div> <h2>Darth Vader invades!</h2> <p>Replace first Yoda's quote with a quote written by Darth Vader</p> <button id="update-button">Replace Yoda's quote</button></div>
We will also create an external JavaScript file to execute a PUT request. According to Express conventions, this JavaScript is kept in a folder called public
$ mkdir public$ touch public/main.jsThen, we have to tell Express to make this public folder accessible to the public by using a built-in middleware called express.static
app.use(express.static('public'))We now can add the main.js file to the index.ejs file:
<body> <!-- ... --> <script src="/main.js"></script></body>We will send a PUT request when the button gets clicked. This means we need to listen to a click event.
Next, we’re going to send the PUT request when the button is clicked:
const update = document.querySelector('#update-button')
update.addEventListener('click', _ => {  // Send PUT Request here})
Sending a PUT Request
The easiest way to trigger a PUT request in modern browsers is to use the Fetch API.
Fetch has the following syntax:
fetch(endpoint, options)In this case, let’s say we want to send the request to /quotes. We’ll set endpoint to /quotes.
update.addEventListener('click', _ => { fetch('/quotes', { /* ... */ })})We need to send a PUT request this time. We can do this by setting Fetch’s method to put.
update.addEventListener('click', _ => { fetch('/quotes', { method: 'put', })})Modern applications send JSON data to servers. They also receive JSON data back to servers. JSON stands for JavaScript Object Notation. They’re like JavaScript objects, but each property and value are written between two quotation marks.
Here’s an example of JavaScript data:
const data = { name: 'Darth Vader', quote: 'I find your lack of faith disturbing.',}And what its JSON counterpart looks like. (Notice how everything is wrapped between two ").
{ "name": "Darth Vader", "quote": "I find your lack of faith disturbing."}We need to tell the server we’re sending JSON data by setting the Content-Type headers to application/json.
update.addEventListener('click', _ => { fetch('/quotes', { method: 'put', headers: { 'Content-Type': 'application/json' }, })})Next, we need to convert the data we send into JSON. We can do this with JSON.stringify. This data is passed via the body property.
update.addEventListener('click', _ => { fetch('/quotes', { method: 'put', headers: { 'Content-Type': 'application/json' }, body: JSON.stringify({ name: 'Darth Vader', quote: 'I find your lack of faith disturbing.', }), })})Accepting the PUT request
Our server doesn’t accept JSON data yet. We can teach it to read JSON by using express’s json middleware.
app.use(express.json())Next, we can handle the PUT request with a put method. You should be able to see the values we send from the fetch request.
app.put('/quotes', (req, res) => { console.log(req.body)})
The next step is to change the Yoda’s first quote to this quote by Darth Vader.
Changing Yoda’s quote
MongoDB Collections come with a method called findOneAndUpdate. This method lets us find and change one item in the database. It has the following syntax:
quotesCollection .findOneAndUpdate(query, update, options) .then(result => { /* ... */ }) .catch(error => console.error(error))query lets us filter the collection with key-value pairs. If we want to filter quotes to those written by Yoda, we can set { name: 'Yoda' } as the query.
quotesCollection .findOneAndUpdate({ name: 'Yoda' }, update, options) .then(result => { /* ... */ }) .catch(error => console.error(error))update, tells MongoDB what to change. It uses MongoDB’s update operators like $set, $inc and $push.
We will use the $set operator since we’re changing Yoda’s quotes into Darth Vader’s quotes:
quotesCollection .findOneAndUpdate( { name: 'Yoda' }, { $set: { name: req.body.name, quote: req.body.quote, }, }, options, ) .then(result => { /* ... */ }) .catch(error => console.error(error))options tells MongoDB to define additional options for this update request.
In this case, it’s possible that no Yoda quotes exist in the database. We can force MongoDB to create a new Darth Vader quote if no Yoda quotes exist. We do this by setting upsert to true. upsert means: Insert a document if no documents can be updated.
quotesCollection .findOneAndUpdate( { name: 'Yoda' }, { $set: { name: req.body.name, quote: req.body.quote, }, }, { upsert: true, }, ) .then(result => { /* ... */ }) .catch(error => console.error(error))Finally, let’s log the result into the command line.
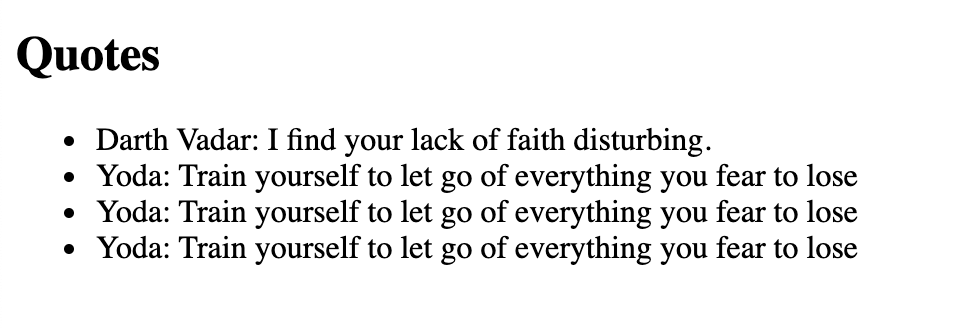
app.put('/quotes', (req, res) => { quotesCollection.findOneAndUpdate(/* ... */) .then(result => { console.log(result) }) .catch(error => console.error(error))}Try clicking the “replace first Yoda quote” button in the browser. You should see this result in your command line. This says we changed one of Yoda’s quote.
If you refresh the browser, you should see Darth Vader’s quote as the first quote.
Does the findOneAndUpdate look complicated to you? Well, It IS complicated.
This is why I use Mongoose instead of MongoDB. You can find out more about
Mongoose in this article.
Finally, we need to respond to the JavaScript that sent the PUT request. In this case, we’ll simply send the success message.
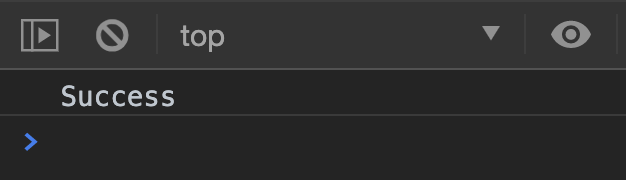
app.put('/quotes', (req, res) => { quotesCollection.findOneAndUpdate(/* ... */) .then(result => { res.json('Success') }) .catch(error => console.error(error))}Next, we can handle the response from the server via a then object. (We do this because fetch returns a promise). However, Fetch is slightly different from most promises. You need to use another then object to get the response from the server.
Here’s what you should do:
fetch({ /* request */}) .then(res => { if (res.ok) return res.json() }) .then(response => { console.log(response) })You should be able to see a Success message from the server in the console.
I wrote an article on the Fetch API if you’re wondering why we need two
then calls. Give it a read! It’ll help cement your understanding.
If you are working on a fancy webapp, you can use JavaScript to update the DOM, so users see the new changes immediately.
However, updating the DOM is out of scope of this article, so we’re just going to refresh the browser to see the changes.
fetch({ /* request */}) .then(res => { if (res.ok) return res.json() }) .then(response => { window.location.reload(true) })If you want to learn to use JavaScript to update the DOM, I suggest going through my Learn JavaScript course. I even teach you how make your interface fast and snappy! (Check the Todolist Component).
That’s it for the UPDATE operation! Let’s move on to delete.
CRUD - DELETE
The DELETE operation can be triggered through a DELETE request. It’s similar to the UPDATE request so this should be simple if you understand what we’ve done above.
For this, let’s delete the first quote by Darth Vader.
First, we need to add a delete button to index.ejs.
<div> <h2>Remove Darth Vader!</h2> <p> Delete one Darth Vader's quote. Does nothing if there are no more Darth Vader's quote </p> <button id="delete-button">Delete Darth Vader's quote</button></div>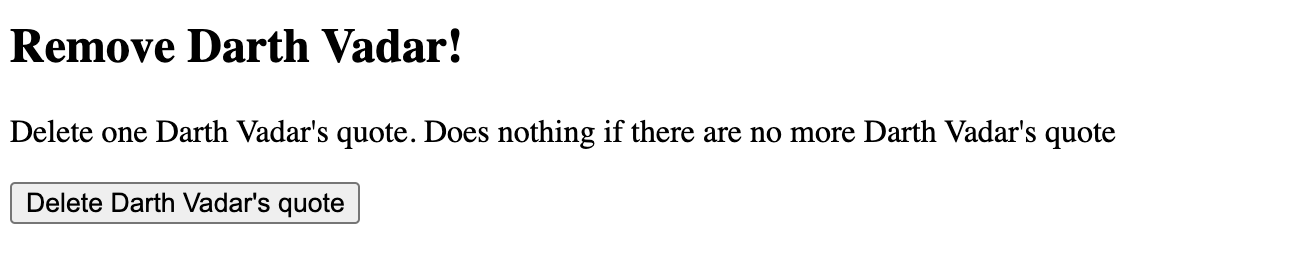
Then, we’ll trigger a DELETE request through Fetch when a user clicks the delete button.
const deleteButton = document.querySelector('#delete-button')
deleteButton.addEventListener('click', _ => {  fetch('/quotes', {    method: 'delete',  })})
Since we’re deleting a quote by Darth Vader, we only need to send Darth Vader’s name to the server.
deleteButton.addEventListener('click', _ => { fetch(/* ... */, { method: 'delete', headers: { 'Content-Type': 'application/json' }, body: JSON.stringify({ name: 'Darth Vader' }) }) .then(res => { if (res.ok) return res.json() }) .then(data => { window.location.reload() })})We can then handle the event on our server side with the delete method:
app.delete('/quotes', (req, res) => { // Handle delete event here})Deleting a document from MongoDB
MongoDB Collections has a method called deleteOne. It lets us remove a document from the database. It takes in two parameters: query and options.
quotesCollection .deleteOne(query, options) .then(result => { /* ... */ }) .catch(error => console.error(error))query works like query in findOneAndUpdate. It lets us filter the collection to the entries we’re searching for. In this case, we can set name to Darth Vader.
quotesCollection .deleteOne({ name: 'Darth Vader' }, options) .then(result => { /* ... */ }) .catch(error => console.error(error))However, since we already pass the name Darth Vader from Fetch, we don’t need to hardcode it in Express anymore. We can simply use req.body.name.
app.delete('/quotes', (req, res) => { quotesCollection.deleteOne({ name: req.body.name }, options)})In this case, we don’t need to change any options, so we can omit options.
app.delete('/quotes', (req, res) => { quotesCollection.deleteOne({ name: req.body.name })})Then, we can send a response back to the JavaScript in the then call.
app.delete('/quotes', (req, res) => { quotesCollection .deleteOne({ name: req.body.name }) .then(result => { res.json(`Deleted Darth Vader's quote`) }) .catch(error => console.error(error))})Now, when you click the delete button, the browser will send the DELETE request through Fetch to our Express server. Then, the server responds by sending either an error or a message back.
What if there are no more Darth Vader quotes?
If there are no more Darth Vader quotes, result.deletedCount will be 0. We can send a message that tells the browser that there are no more Darth Vader quotes to delete.
app.delete('/quotes', (req, res) => { quotesCollection .deleteOne(/* ... */) .then(result => { if (result.deletedCount === 0) { return res.json('No quote to delete') } res.json(`Deleted Darth Vader's quote`) }) .catch(error => console.error(error))})If the JavaScript receives a No quote to delete response, we can tell the user there’s no Darth Vader quote to delete.
To do this, let’s add an element where we can tell users about this message.
<div id="message"></div>If we receive No quote to delete, we can change the textContent of this .message div.
const messageDiv = document.querySelector('#message')
deleteButton.addEventListener('click', _ => {  fetch(/* ... */)    .then(/* ... */)    .then(response => {      if (response === 'No quote to delete') {        messageDiv.textContent = 'No Darth Vader quote to delete'      } else {        window.location.reload(true)      }    })    .catch(/* ... */)})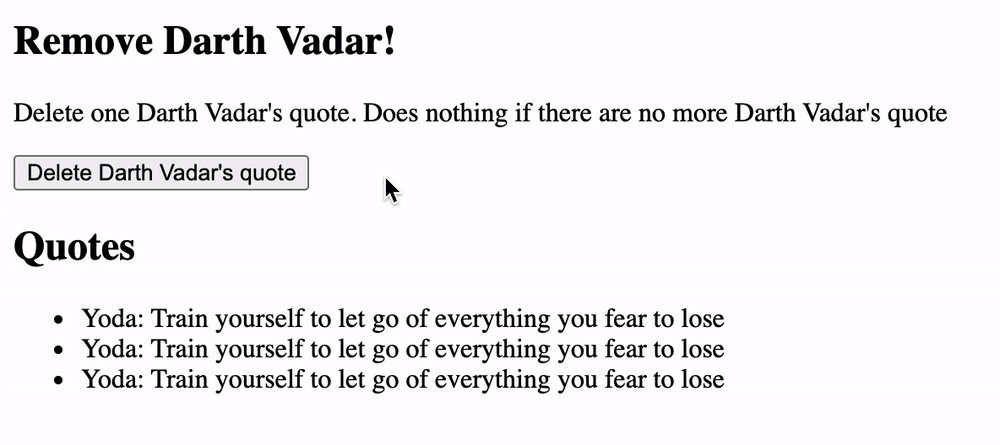
That’s it for the DELETE operation!
Make it look better…
The final step is to make the app look a little better by sprinkling some styles!
Wrapping Up
We covered A LOT in this mega tutorial. Here’s a list of things we’ve done together:
- Understood what Express, Node, and MongoDB are used for
- Understood CRUD
- Executed Create, Read, Update and Delete operations
- Created an Atlas account for MongoDB
- Save, read, update, and delete from MongoDB
- Display variable data with template engines
You have now learned all you need to know about creating simple applications with Node, Express, and MongoDB. Now, go forth and create more applications, young padawan. May the force be with you.
Grab the Source Code
You can grab the source code by leaving your name and email address in this form. I’ll also send you this article in PDF so you can read it at your leisure.
Further reading
Here’s some further readings if you’re interested to continue with the Node, Express, MongoDB journey
- Express articles
- MongoDB articles
- Testing related articles