Connecting Jest and Mongoose
The hard part about testing a backend application is setting up a test database. It can be complicated.
Today, I want to share how I setup Jest and Mongoose.
Setting up Mongoose with Jest
Jest gives you a warning if you try to use Mongoose with Jest.

If you don’t want to see this error, you need to set testEnvironment to node in your package.json file.
"jest": { "testEnvironment": "node"}Setting up Mongoose in a test file
You want to connect to a database before you begin any tests. You can use the beforeAll hook to do so.
beforeAll(async () => { // Connect to a Mongo DB})To connect to a MongoDB, you can use Mongoose’s connect command.
const mongoose = require('mongoose')const databaseName = 'test'
beforeAll(async () => {  const url = `mongodb://127.0.0.1/${databaseName}`  await mongoose.connect(url, { useNewUrlParser: true })})
This creates a connection to the database named test. You can name your database anything. You’ll learn how to clean them up later.
Note: Make sure you have an active local MongoDB Connection before you test. Your tests will fail if you don’t have an active local MongoDB Connection. Read this to learn how to create a local MongoDB connection.
Creating databases for each test file
When you test, you want to connect to a different database for each test file, because:
- Jest runs each test file asynchronously. You won’t know which file comes first.
- You don’t want tests to share the same database. You don’t want data from one test file to spill over to the next test file.
To connect to a different database, you change the name of the database.
// Connects to database called avengersbeforeAll(async () => { const url = `mongodb://127.0.0.1/avengers` await mongoose.connect(url, { useNewUrlParser: true })})// Connects to database power-rangersbeforeAll(async () => { const url = `mongodb://127.0.0.1/power-rangers` await mongoose.connect(url, { useNewUrlParser: true })})Sending a POST request
Let’s say you want to create a user for your app. The user has a name and an email address. Your Mongoose Schema might look like this:
const mongoose = require('mongoose')const Schema = mongoose.Schema
const userSchema = new Schema({  name: String,  email: {    type: String,    require: true,    unique: true  }})
module.exports = mongoose.model('User', userSchema)
To create a user, you need to save the name and email into MongoDB. Your route and controller might look like this:
const User = require('../model/User') // Link to your user model
app.post('/signup', async (req, res) => {  const { name, email } = req.body  const user = new User({name, email})  const ret = await user.save()  res.json(ret)})
To save the user into the database, you can send a POST request to signup. To send a post request, you use the post method. To send data along with the POST request, you use the send method. In your tests, it’ll look like this.
it('Should save user to database', async done => { const res = await request.post('/signup') .send({ name: 'Zell', }) done()})Note: If you run this code two times, you’ll get an E1100 duplicate key error. This error occurred because:
- We said the
emailshould beuniquein the Schema above. - We tried to create another user with
[email protected]. even though one already exists in the database. (The first one was created when you sent the first request).

Cleaning up the database between tests
You want to remove entries from the database between each test. This ensures you always start with an empty database.
You can do this with the afterEach hook.
// Cleans up database between each testafterEach(async () => { await User.deleteMany()})In this code above, we only cleared the User collection in the database. In a real scenario, you want to clear all collections. You can use the following code to do so:
async function removeAllCollections () {  const collections = Object.keys(mongoose.connection.collections)  for (const collectionName of collections) {    const collection = mongoose.connection.collections[collectionName]    await collection.deleteMany()  }}
afterEach(async () => {  await removeAllCollections()})
Testing the Endpoint
Let’s begin our tests. In this test, we will send a POST request to the /signup endpoint. We want to make sure:
- The user gets saved to the database
- The returned object contains information about the user
Checking if the user was saved to the database
To check whether the user gets saved into the database, you search the database for the user.
const User = require('../model/User') // Link to your user model
it('Should save user to database', async done => { const res = await request.post('/signup') .send({ name: 'Zell', })
// Searches the user in the database
done()})If you console.log user, you should see something like this:
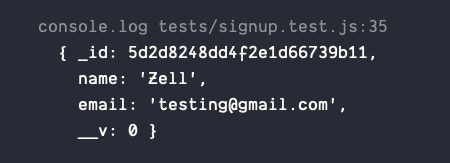
This means our user got saved to the database. If we want to confirm the user has a name and an email, we can do expect them to be true.
it('Should save user to database', async done => { // Sends request...
// Searches the user in the database expect(user.name).toBeTruthy() expect(user.email).toBeTruthy()
done()})Checking if the returned object contains the information about the user
We want to make sure the returned object contains the user’s name and email address. To do this, we check the response from the post request.
it('Should save user to database', async done => {  // Sends request...
  // Searches the user in the database...
  // Ensures response contains name and email  expect(res.body.name).toBeTruthy()  expect(res.body.email).toBeTruthy()  done()})
We’re done with our tests now. We want to delete the database from MongoDB.
Deleting the database
To delete the database, you need to ensure there are 0 collections in the database. We can do this by dropping each collection we used.
We’ll do after all our tests have run, in the afterAll hook.
afterAll(async () => { // Removes the User collection await User.drop()})To drop all your collections you can use this:
async function dropAllCollections () {  const collections = Object.keys(mongoose.connection.collections)  for (const collectionName of collections) {    const collection = mongoose.connection.collections[collectionName]    try {      await collection.drop()    } catch (error) {      // This error happens when you try to drop a collection that's already dropped. Happens infrequently.      // Safe to ignore.      if (error.message === 'ns not found') return
      // This error happens when you use it.todo.      // Safe to ignore.      if (error.message.includes('a background operation is currently running')) return
      console.log(error.message)    }  }}
// Disconnect MongooseafterAll(async () => {  await dropAllCollections()})
Finally, you want to close the Mongoose connection to end the test. Here’s how you can do it:
afterAll(async () => { await dropAllCollections() // Closes the Mongoose connection await mongoose.connection.close()})That’s everything you need to do to setup Mongoose with Jest!
Refactoring
There’s a lot of code that goes into beforeEach, afterEach, and afterAll hooks. We will be using them for every test file. It makes sense to create a setup file for these hooks.
const mongoose = require('mongoose')mongoose.set('useCreateIndex', true)mongoose.promise = global.Promise
async function removeAllCollections () {  const collections = Object.keys(mongoose.connection.collections)  for (const collectionName of collections) {    const collection = mongoose.connection.collections[collectionName]    await collection.deleteMany()  }}
async function dropAllCollections () {  const collections = Object.keys(mongoose.connection.collections)  for (const collectionName of collections) {    const collection = mongoose.connection.collections[collectionName]    try {      await collection.drop()    } catch (error) {      // Sometimes this error happens, but you can safely ignore it      if (error.message === 'ns not found') return      // This error occurs when you use it.todo. You can      // safely ignore this error too      if (error.message.includes('a background operation is currently running')) return      console.log(error.message)    }  }}
module.exports = {  setupDB (databaseName) {    // Connect to Mongoose    beforeAll(async () => {      const url = `mongodb://127.0.0.1/${databaseName}`      await mongoose.connect(url, { useNewUrlParser: true })    })
    // Cleans up database between each test    afterEach(async () => {      await removeAllCollections()    })
    // Disconnect Mongoose    afterAll(async () => {      await dropAllCollections()      await mongoose.connection.close()    })  }}
You can import the setup file for each test like this:
const { setupDB } = require('../test-setup')
// Setup a Test DatabasesetupDB('endpoint-testing')
// Continue with your tests...
There’s one more thing I want to show you.
When you create tests, you want to seed the database with fake data. I came up with a way to seed the database easily. And I’ll show it to you in the next article.