A Gulp.js Tutorial (Part 2)
Last week, we set up a simple gulp task to convert Sass into CSS. We also touched on how to watch the styles.scss file for changes and how to reload the browser automatically with Browser Sync.
In this article, we’re going to dive further into the sass task to find out how to watch more than one file for changes, and how to customize options for the plugins that we have used.
Let’s get started.
Note: This article is outdated. The latest version can be found here
Before you read this article
Make sure you’ve checked out the first article before continuing on to this article. We’re building up on what we have made previously.
A key thing about build workflows is that you’ll often need to watch more than one file.
Let’s begin here.
Watching more than one file
You’ll need to use a glob, a matching pattern for files, to watch more than one file. The idea of a glob is similar to that of a regular expression, where you check if a file name has a specific pattern. Once the pattern is identified, we say that it is matched.
Most workflows tend to only use these 4 different globbing patterns. They are:
*.scss- The*pattern is a wildcard that matches any pattern in the specified folder. In this case, we’re matching any files ending with.scssin the root folder.**/*.scss- This is a more extreme version of the*pattern that matches any file ending with.scssin the root folder and any child directories.!not-me.scss- The!indicates that Gulp should exclude the pattern from its matches, which is useful if you had to exclude a file from a matched pattern. In this case,not-me.scsswould be excluded from a match.*.+(scss|sass)- The plus+and parenthesis()allows Gulp to match multiple patterns, with patterns separated by the pipe|character. In this case, Gulp will match any file ending with.scssor.sassin the root folder.
We can use these globbing patterns in 3 different gulp methods. – gulp.src, gulp.dest and gulp.watch. Let’s see how to place globs into these methods in our current sass task.
First of all, we may need to compile more than one Sass file into CSS within the app/scss folder. We can check for all .scss files by using the **/* pattern.
You might also have a mix of files ending with .scss and .sass in some projects. If that’s true, you can also use the +(|) pattern to allow Gulp to match files ending with both .sass and .scss.
Here’s how we can modify the sass task to include globbing:
gulp.task('sass', function() { return gulp.src('app/scss/**/*.+(scss|sass)') // Gets all files ending with .scss or .sass in app/scss .pipe(sourcemaps.init()) .pipe(sass()) .pipe(autoprefixer()) .pipe(sourcemaps.write()) .pipe(gulp.dest('app/css')) .pipe(browserSync.reload({ stream: true }));})Our sass task should now pick up any additional .sass or .scss files we have in the app/scss folder.
So if you created a new print.scss file within app/scss and ran gulp sass, you should be able to see print.css file in app/css.
We want to add the same globs to our watch task as well so Gulp will automatically run the sass task if any .scss or .sass file is changed:
gulp.task('watch', ['sass', 'browserSync'], function() { gulp.watch('app/scss/**/*.+(scss|sass)', ['sass']); gulp.watch('app/index.html', browserSync.reload);})Let’s add globbing to reload the browser whenever any .html files are changed since we’re now on the watch task:
gulp.task('watch', ['sass', 'browserSync'], function() { gulp.watch('app/scss/**/*.+(scss|sass)', ['sass']); gulp.watch('app/*.html', browserSync.reload);})Now, Gulp will detect changes and reload the browser for all files ending with .htmlas well as .scss or .sass in the respective folders.
And that’s everything you need to know about globbing to configure Gulp tasks for different folders in your project.
Let’s find out how to change the default options for Gulp plugins next.
Changing Plugin Options
Most gulp plugins can be customized to a certain extend if you passed an options object into them. Here’s how a task would look like if the options object has been predefined:
.gulp.task('task-name', function() { return gulp.src('source-files') .pipe(plugin(options)) .pipe(gulp.dest('destination'))})If you were wondering, each options object is a JavaScript object that may contain one or more key-value pairs.
// JavaScript Objectvar options = { key1: value1, key2: value2 //... Other key-value pairs}You don’t necessarily have to create a separate options object for each gulp plugin. In fact, you can leave the options object within the gulp plugin itself:
.gulp.task('task-name', function() { return gulp.src('source-files') .pipe(plugin({ key1: value1, key2: value2 })) .pipe(gulp.dest('destination'))})Different plugins will contain different key-value pairs. Hence you’ll have to read the plugin documentation if you want to customize them.
Let’s use gulp-autoprefixer as an example as we walk through how to customize a plugin.
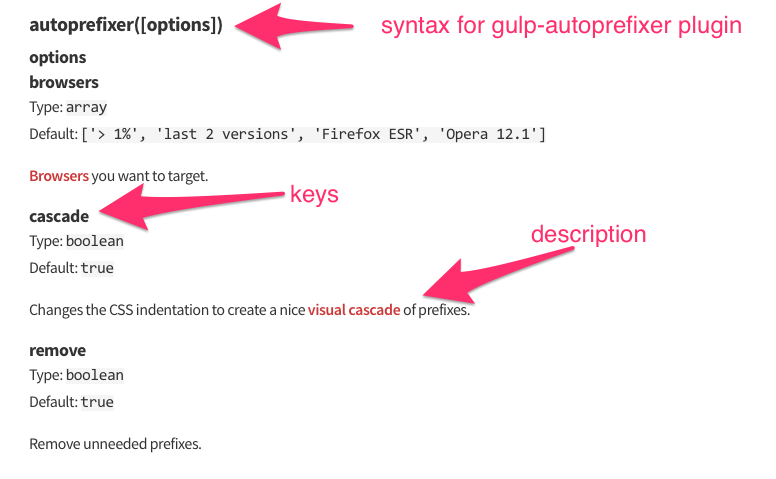
First, head over to gulp-autoprefixer’s documentation to find out what key-value pairs are available for customization.
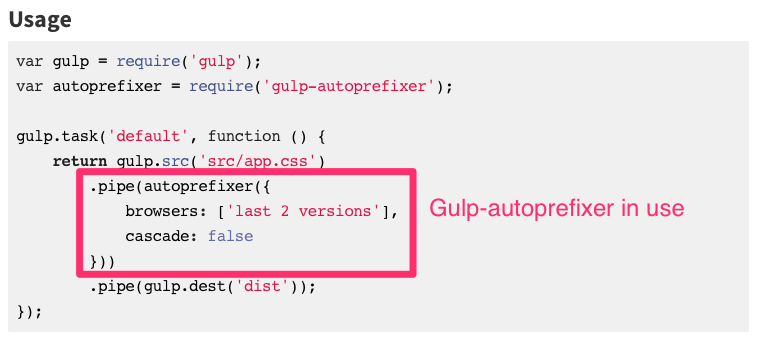
At the documentation page, there’s an example of how gulp-autoprefixer can be used with different options.

Perfect, so now we know that there are at least two keys for the gulp-autporefixer plugin, browsers and cascade, and what they do. There’s also a third key, browsers as well.

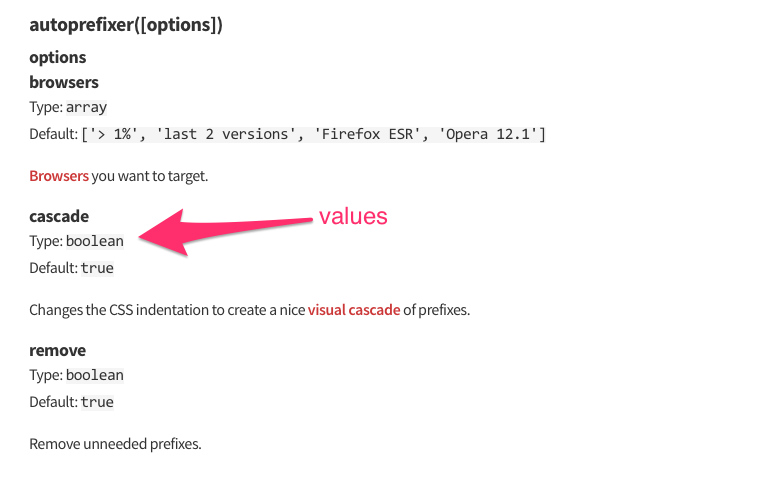
We can also find out what values each key can take.

The values for cascade and remove are true or false since they’re Booleans. The browsers key, however, is not as straightforward as it seems, and we can find out more by clicking on the browsers link, which leads us to autoprefixer’s repo.

We still don’t know exactly what values the browsers array can take though. Luckily, there’s another clue for us to find out more. Let’s click on the browserlist link.

And here is the information we need for the browsers array.
It turns out that Gulp-autoprefixer depends on autoprefixer, which in turn depends on Browserlist. Open source tools work like this sometimes, and you’ll have to dive further in to figure out certain key-value pairs.
We can finally customize the browser values now. If we wanted to prefix for both IE 8 and IE 9, plus 2 recent versions of all other browsers, we can simple set the browsers value to ['ie 8-9', 'last 2 versions'].
Here’s how it would look in the sass task:
gulp.task('sass', function(){ return gulp.src('app/scss/**/*.+(scss|sass)') //.. sourcemaps and sass .pipe(autoprefixer({ browsers: ['ie 8-9', 'last 2 versions'] })) //... other plugins .pipe(gulp.dest('app/css'))});Not too difficult was it? :)
All gulp-related plugins have the same configuration, so you can check out gulp-sass and gulp-sourcemaps to see their options object as well.
For now, let’s try customizing another package that’s slightly different – Browser Sync
Customizing Browser Sync
Browser Sync has a shitload of options to configure. Instead of jumping in and reading every option in there, let’s take a step back and first think about what kind of configurations we might need with browser sync.
We have already set up browser sync to spin up a server and serve app directory on localhost:3000 when the browserSync task starts.
Sometimes you might want to run the server on a port other than 3000. We can configure the port key to do so.
gulp.task('browserSync', function() { browserSync({ server: { baseDir: 'app' }, port: 8080 })})Browser Sync will now spin up a server on port 8080 instead of 3000 once we set this configuration.
In some cases you might already have a server running with Mamp Pro or another method, and you want Browser Sync to run on that host instead.
You can configure Browser Sync to do so by using the proxy key instead of the server key.
gulp.task('browserSync', function(){ browserSync({ proxy: 'local.dev' // Or if it's a localhost url: // proxy: 'localhost:8080' })})You’d also have noticed that Browser Sync automatically opens the default browser for you when the task starts. If you want Browser Sync to stop this behavior, or use another browser instead, you can change the browser key.
gulp.task('browserSync', function() { browserSync({ server: { baseDir: 'app' }, // Opens Google chrome browser browser: 'google chrome' })})Finally, if the notification on the top right side of BrowserSync is irritating for you, you might want to consider removing it by setting the notify key to false.
gulp.task('browserSync', function() { browserSync({ server: { baseDir: 'app' }, // Opens Google chrome browser browser: 'google chrome', notify: false })})Browser Sync provides lots of options to configure, if there’s something you want to do, but isn’t covered in this article, you might want to try looking at the documentation directly.
Wrapping Up
These two articles would have taught you the very basics of Gulp. You’ve learned how to set things up, how to write a gulp task, use gulp plugins and find more information on each plugin you use.
Of course, there’s still way more to Gulp than what was covered in these two tutorials, but with this knowledge you can go ahead and figure out what other gulp plugins might be great to add to your workflow.
Here are some ideas you’ll want to consider for a great workflow:
- Creating CSS-sprites with sprity
- Compiling only files that have changed with gulp-changed
- Writing ES6 with Babel
- modularizing JavaScripts with Browserify
- Modularizing HTML with Template engines like Handlebars or Swig
- Image and SVG optimization with imagemin
- Optimizing CSS and JavaScripts with useref
- Removing unused CSS with unCSS
- Further optimizing CSS with CSSO
- Generating inline CSS for performance with Critical
- Deploying with rSync
- Chaining tasks together with run sequence
- Splitting Gulpfile into smaller files with require-dir
To be honest that’s a pretty big list of things you can do to setup your workflow. It can get overwhelming to set everything up if you’re still new to it.
To help you out, I’m writing a book on automating your workflow to help you dive even deeper into Gulp and add these awesome tools to your workflow in a simple, coherent manner.
Check out the book if you’d like to find out more :)
What did you learn from this articles? What else are you stuck with? I’d love to hear your questions and comments so I can help you out!
