How to use the :empty selector and the :blank selector
I made a terrible mistake when I tweeted about :empty and :blank a month ago. I said that :empty wasn’t useful, and :blank is much more useful than :empty.

I was wrong!
:empty is actually good enough. We don’t even need :blank!
Okay, first off, what is :empty and what is :blank?
:empty and :blank
:empty is a pseudo selector. It lets you select elements that are empty.
:empty { /* do something */}Empty elements are elements that have nothing in them. It cannot even have a whitespace.
<!-- Example of an empty element --><div></div>Empty elements can have comments though, as long as the comments fill up the entire element.
<!-- Empty can have comments --><div><!-- this is a comment --></div>:blank is a powered-up form of :empty. It lets you select elements that have whitespaces in them:
<!-- Matched with :blank but not with :empty --><div></div>:empty and :blank in real world situations
Both :empty and :blank are useful if need to:
- Style an empty element
- Create empty states
Styling an empty element
Let’s say you have a <div>. You will only fill up this <div> with content when an error occurs.
<!-- Without errors --><div class="error"></div>
<!-- With errors --><div class="error">Whoops! Something went wrong!</div>
Here, you need to style the .error div. If you don’t use :empty, you need to rely on a class or attribute. This feels redundant.
<!-- With errors --><div class="error" data-state="error">Whoops! Something went wrong!</div>.error { display: none; background-color: hsl(0, 20%, 50%); padding: 0.5em 0.75em;}
.error[data-state='error'] { display: block;}But if you use :empty, you don’t need the extra class or attribute. You can style the .error directly. You don’t even need display: none;!
.error {  background-color: hsl(0, 20%, 50%);  padding: 0.5em 0.75em;}
.error:empty {  padding: 0;}
Here’s a codepen for you to play with. (P.S. Try removing the padding: 0; from .error:empty. You’ll see a red background 😉).
Creating empty states
Let’s say you want to create a todo-list. When your users see the todo-list for the first time, they will probably see zero todo items.
What do you show when there are zero todos?
This zero todo state is what we call an empty state.
If you want to create an empty state for your todo-list, you can add an extra <div> after your <ul>. When you do so, you can use a combination of :empty and the + (adjacent sibling) or ~ (subsequent sibling) selector to style the empty state.
<ul> <li>Item 1</li> <li>Item 2</li> <li>Item 3</li></ul><div class="empty-state"></div>.empty-state { display: none;}
ul:empty + .empty-state { display: block;}I learned how to use :empty this way from Heydon Pickering. Check out Heydon’s article on Inclusive Components if you want to see the todo-list example at work.
Note: empty states are important. If you need some convincing, check out this article on Invision.
Why is :empty enough?
I felt :empty isn’t good enough because of two reasons:
- Poor developer experience
- I’ll need to trim whitespaces manually with JavaScript
The first reason is valid, but it isn’t a big deal.
The second reason is not valid. I assumed I had to trim whitespaces, but I don’t need to.
EDIT: The second reason is valid too! I have no idea why my tests went haywire when writing this article. I found out about it thanks to Daniel and Konrud5 (below).
I’ll walk you through both of them.
Poor developer experience
Let’s go back to the todo-list example. Say we created a todo-list and we have this markup.
<ul> <li>Item 1</li> <li>Item 2</li> <li>Item 3</li></ul><div class="empty-state"></div>How would you check if :empty was working?
Well, I would remove each <li> with cmd + x. This command cuts the entire line. When I removed all three <li>, I’ll end up with this markup:
<ul></ul>By now, you’ll know the HTML above won’t trigger :empty. :empty only works when there are no whitespaces in the element.
I had to remove the whitespaces for :empty to work, which means a few more keystrokes. This was a chore I hope I didn’t have to go through.
But then again, it’s a small problem for a big benefit.
You need to trim whitespaces manually with JavaScript
I say it again. You don’t need to trim whitespaces manually in JavaScript if you use :empty. I made a wrong assumption.
You need to trim whitespace manually in JavaScript if you want to use :empty.
Let’s go through an example and you’ll see what I mean. We’ll use the todo-list example one more time.
Say we have this HTML right now.
<ul> <li>Item 1</li></ul><div class="empty-state"></div>For the empty state to work, we need to remove the final <li> item from <ul>. If you use plain JavaScript, you can do this with removeChild.
const ul = document.querySelector('ul')const li = ul.children[0]
ul.removeChild(li)
removeChild will produce HTML that contains whitespaces in them (even though it might not show up in the inspector). You can check for text nodes (hence whitespaces) with the childNodes property.
Since removeChild doesn’t strip whitespaces, you need to strip them by yourself. This is extra JavaScript.
const ul = document.querySelector('ul')const li = ul.children[0]
ul.removeChild(li)
if (ul.children.length === 0) {  ul.innerHTML = ''}
Here’s the code for this example:
Support for :empty and :blank
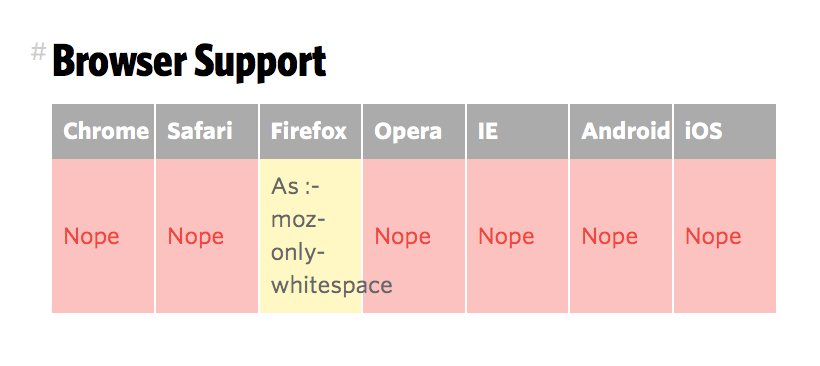
:empty supported on all browsers, and :blank has poor browser support. This gives you plenty of reason to use :empty over :blank today!


I hope that browser support for :blank improves one day though.
Wrapping up
:empty and :blank let you style empty elements and produce empty states easily.
:blank is better than :empty because it provides us with a better developer experience. But we can’t use :blank because :blank doesn’t have enough browser support,
:empty is often good enough. You can use it already. Use it all out want 😉!
Give :empty a go and let me know what you think!
